
1. Introduction
When working with Incidents in ServiceNow, we often select a caller to identify the person who reported the issue.
But what if we also want to see the caller’s email address and manager automatically?
Instead of entering these details manually, we can customize the Incident form to populate them automatically.
In this practical example, I added two custom fields to the Incident form:
- Caller Email
- Caller Manager
I used Form Design, Script Includes, GlideAjax, and two Client Scripts: onLoad and onChange to implement this functionality.
Let’s understand how it works step by step.
2. What Will We Build?
When an Incident record is opened, ServiceNow will retrieve the selected caller’s email address and manager.
When the caller is changed, the information will be updated automatically.
For example:
| Field | Example value |
| Caller | John Smith |
| Caller Email | john@example.com |
| Caller Manager | Jane Smith |
These are illustrative values. The actual information comes from the selected caller’s record in ServiceNow.
3. Step One: Add Custom Fields to the Incident Form
First, I added two custom fields to the Incident form using Form Design.
The fields are:
- u_caller_email
- u_caller_manager
Steps
- Open an Incident record.
- Open Form Design from the form’s configuration options.
- Create or locate the Caller Email and Caller Manager fields.
- Add both fields to the Incident form.
- Save the form layout.
These fields provide a place to display the information retrieved from the User table.
Important: The fields must exist on the Incident table, and their actual field names must match the names used in the scripts.
4. Step Two: Create the Script Include
A Script Include lets us write reusable server-side code.
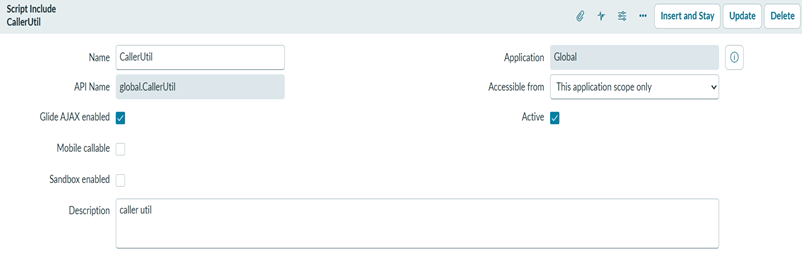
I created a Script Include named CallerUtil to retrieve the caller’s email and manager from the sys_user table.
Configuration:
- Name: CallerUtil
- Active: Checked
- Client callable: Checked
Code:
How does it work?
- sys_user is the table containing user records.
- sysparm_user_id receives the sys_id of the selected caller.
- getEmail() returns the caller’s email address.
- getManager() returns the sys_id of the caller’s manager.
- AbstractAjaxProcessor allows the Script Include to receive GlideAjax requests.
We can reuse these functions in different Client Scripts instead of writing the same database logic repeatedly.
5. Step Three: Create the onLoad Client Script
The onLoad Client Script runs when an Incident form is opened.
Its purpose is to retrieve the caller’s details when the form loads, which is especially useful when opening an existing Incident with a caller already selected.
Configuration:
- Type: onLoad
- Table: Incident
Code:
Understanding the onLoad Script
What is onLoad()?
It executes when the form loads.
What is g_form.getValue(‘caller_id’)?
It gets the value of the Caller field, which is the selected user’s sys_id.
What is GlideAjax?
It sends a request to the server to retrieve information using the Script Include.
What is g_form.setValue()?
It places the returned information into the corresponding Incident field.
This script helps populate the fields when an existing Incident is opened.
6. Step Four: Create the onChange Client Script
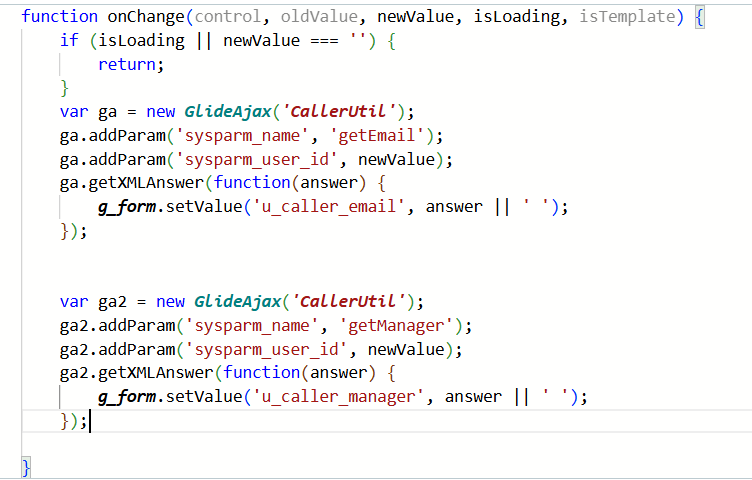
The onLoad script handles the form when it opens. But what happens if the user changes the caller afterward?
That is where the onChange Client Script comes in.
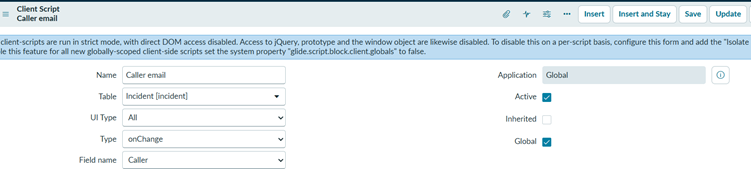
Configuration:
- Type: onChange
- Field name: caller_id
- Table: Incident
Code:
Why do we need both Client Scripts?
The onLoad script retrieves information when the form opens.
The onChange script retrieves updated information when the caller changes.
Together, they cover both situations.
7. Step Five: Test the Functionality
Test the functionality by following these steps:
- Open an Incident that already has a caller selected.
- Verify whether Caller Email and Caller Manager populate.
- Change the caller to another user.
- Verify that both fields update with the new caller’s details.
- Clear the caller and verify that both fields are cleared.

If the values do not appear, check the field names, Script Include configuration, API name, application scope, and whether the selected user has an email address and manager configured.
8. How Does the Complete Solution Work?
The process is simple:
- The Incident form opens, or the caller changes.
- The appropriate Client Script runs.
- GlideAjax sends the caller’s sys_id to CallerUtil.
- The Script Include retrieves the email and manager from sys_user.
- The results return to the browser.
- The Client Script fills in the custom Incident fields.
This process retrieves the information asynchronously, so the form does not need to reload.
9. What Did We Learn?
Through this implementation, we practiced:
- Customizing the Incident form using Form Design.
- Creating reusable Script Includes.
- Using GlideAjax for client-server communication.
- Using onLoad and onChange Client Scripts.
- Retrieving data from the sys_user table using GlideRecord.
- Automatically populating fields based on a reference field.
Conclusion
This small customization demonstrates how ServiceNow can reduce manual work and improve the user experience.
By combining Form Design, Script Includes, GlideAjax, and Client Scripts, we can make Incident forms more informative and responsive.
The key lesson is that onLoad handles the initial form load, while onChange handles changes made by the user.
This is a useful hands-on exercise for anyone beginning their ServiceNow development journey.