
Now Assist brings generative AI skills into ServiceNow workflows. Before any user benefits from them, an administrator has to install, configure, secure and monitor them. The Now Assist Admin Console is where all of that happens. This article covers what the console is, why it matters, when to use it and how to use it, including the roles you need.
What is the Now Assist Admin Console?
The Now Assist Admin Console is a single interface for setting up and monitoring Now Assist. In this context, skills are generative AI powered tools that Now Assist uses to help users get their work done faster.
Key features:
- Plugin setup: turn on generative AI capabilities by installing the required plugins through the Settings page.
- Now Assist panel integration (optional): make skills accessible to agents by adding them to the Next Experience UI. The panel is a globally accessible, AI powered assistant in the Next Experience unified navigation that users can open to summarize and draft content.
- Skill configuration and activation: browse and activate use case specific skills on the Now Assist Skills page.
- Monitoring and analytics: track skill usage, adoption and performance across the platform.
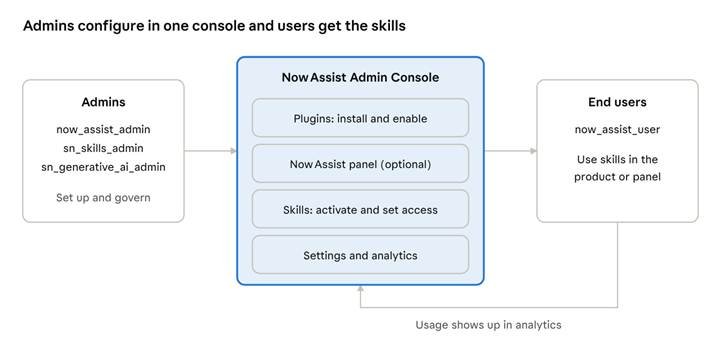
console at a glance · admins, console, users
Admins configure everything in the console; users then work with the skills in the product or the panel, and their usage flows back into analytics.
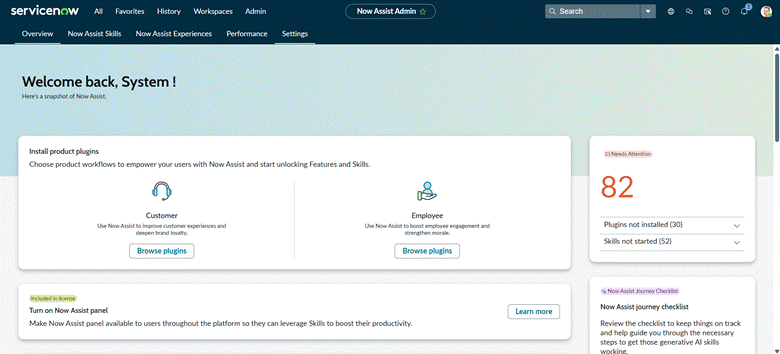
The console homepage has four tabs: Overview, Now Assist Skills, Now Assist Experiences and Settings. The Overview tab holds the Now Assist journey checklist, the plugin cards for Technology, Customer and Employee workflows, a product tour, helpful resources and FAQs. Select the plus signs (+) on each section to learn more about it.
Why use it?
- One place to manage everything: plugins, panel, skills, settings and analytics are all reached from the same console.
- Secure access: the console uses role based access control, so only the right people can configure Now Assist and only authorized roles can run specific skills.
- Data governance: you choose the model provider, which helps your organization meet its data governance requirements.
- Proof of value: built in analytics show adoption and the time saved by AI, so you can show results to stakeholders.
Roles and permissions
The right roles are critical for administering Now Assist.
| Role | Purpose | Typical users |
| now_assist_admin | Full access to configure and manage Now Assist features | Admins |
| now_assist_user | Access to use Now Assist capabilities | End users |
| sn_skills_admin | Manage AI skills and workflows | Skills administrators |
| sn_generative_ai_admin | Configure generative AI settings | Configuration specialists |
In the Admin Console itself, Now Assist Admin has read and write access, while Now Assist User has read only access.
Important: as of version 6.0.20, a Define access step is added to the skill guided setup for regulated market customers. It makes sure only authorized roles can execute specific skills, through ACL (Access Control List) configuration.
When to use it
- Starting out: after you decide to adopt Now Assist, to install plugins for the products your organization uses.
- Adding a use case: whenever you want to activate or edit a skill.
- Governance changes: when you need to change the model provider, data sharing, translation or access settings.
- After rollout: regularly, to monitor usage, adoption and performance.
- After releases: Now Assist is updated every two to three months, so check for newer plugin versions to get new features.
- Troubleshooting: when a skill or the panel does not behave as expected.
How to set it up
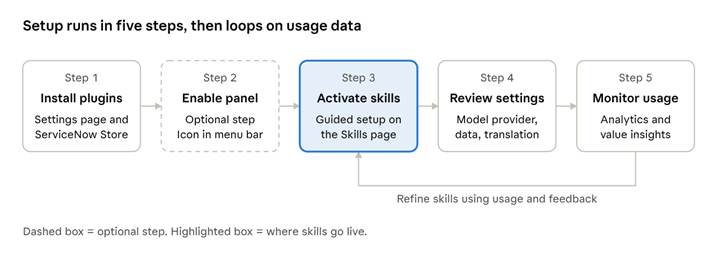
setup flow · 5 steps, 1 loop
The five steps run in order; usage data then feeds back into how you tune your skills.
Step 1: Install plugins
On the Overview tab, select Browse plugins for the workflow you need. Plugins are available for technology, customer, employee and creator workflows. Each plugin card summarizes what it provides. For example, the Now Assist for CSM plugin covers case chat, call and knowledge for customer service.
Before you start: you need the admin role, an instance licensed for Now Assist, and an entitlement for at least one Now Assist application. Install at least one Now Assist product plugin to get started; which one depends on the product your team works in:
| Plugin | Install it when |
| Now Assist for ITSM | Your agents work in IT Service Management, for example summarizing incidents. |
| Now Assist for CSM (sn_csm_gen_ai) | Your agents handle customer service cases and chat. |
| Now Assist for HR Service Delivery (sn_hr_gen_ai) | Your agents handle HR cases and chat. |
| Now Assist for Creator | You build on the platform and want generative help such as code generation. |
Other product plugins exist too, such as Field Service Management, IT Operations Management and Legal Service Delivery. Only the plugins your instance is entitled to can be installed. Some plugins depend on others and must be activated in a set order; each plugin’s Supporting information page in the ServiceNow docs lists them.
Install the plugin for the product you actually use. Do not install the Generative AI Controller, skill or spoke apps one by one; activate skills from the console once your plugin is in.
- In the console, open Settings and select Plugins (or use Browse plugins on the Overview tab). Find the card for your product.
- Select Get plugins on the card, then Install Plugin in the confirmation window. The ServiceNow Store opens in a new browser tab.
- Install the plugin there. Use Application Manager to finalize the installation if required.
- Return to the console and click Refresh to check the installation status.
- The modal confirms the installation and prompts you to go to the Now Assist panel to turn it on.
Step 2: Turn on the Now Assist panel (optional)
Open Settings and go to the Now Assist panel tab. Learn about the panel there and turn it on. You can also configure optional panel features, such as voice input. Once it is on, the Now Assist icon appears in the menu bar for users.
Step 3: Activate skills
Open the Now Assist Skills page. It opens on the tab for the workflow you installed and lists the skills each plugin provides. Select Activate skill to start the guided setup. Each skill is set up a little differently, but using chat summary as an example:
- Triggers: choose when and how the skill is triggered.
- Input data: choose the data the generative AI model uses. You can add extra sources, but the default sources cannot be removed.
- Availability: leave the default (always available) or set custom conditions.
- Define access: from version 6.0.20, for regulated markets, set which roles can run the skill through an ACL. This comes before the display step.
- Display: choose where the skill appears: in the product, in the Now Assist panel, or both. Expand the panel option to choose which roles can use the skill there.
- Review and activate. A notification confirms the skill is active.
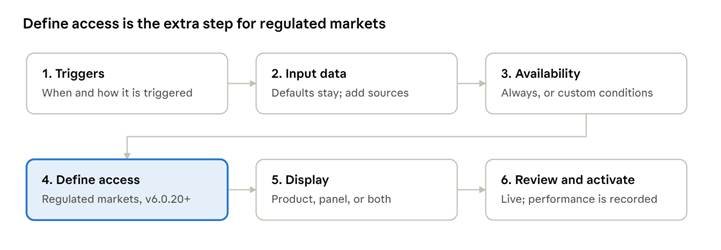
skill guided setup · 6 steps
Define access was added in version 6.0.20 for regulated market customers.
As soon as a skill is active, ServiceNow starts recording its performance and executions. You can edit an active skill later: review general details, view input data, customize the prompt, define availability and change where it displays. The guided screens differ slightly between releases (the Platform Academy session compares Yokohama and Xanadu).
Step 4: Review settings
The Settings tab controls how Now Assist behaves across the instance.
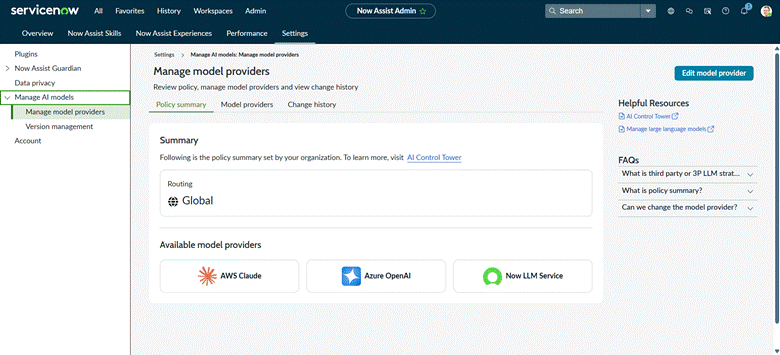
- Manage LLMs: choose the model provider. OEM uses ServiceNow’s pre-configured AI models. BYOK (Bring Your Own Key) uses your own API keys with external providers. Now LLM is ServiceNow’s native large language model, available for regulated markets.
- Dynamic translation: enable multi-language support, including translation for languages you have installed for native translation.
- Access controls: define who can use specific AI features.
- Display modalities: control where AI appears, such as chat or the panel.
- Data sharing: you can opt out. Leaving it on helps improve ServiceNow models.
- Account page: shows your licensing details.
Role synchronization: if roles chosen in the Select display step are not in the ACL, the system prompts you to sync roles automatically, keeping your configuration consistent.
Step 5: Monitor usage
The Analytics page shows usage across products, either in aggregate or per skill. An action is one execution of a generative AI task, either in a product or in the panel. The analytics summary shows how many plugins are installed and which skills users rely on. Key dashboards cover:
- Usage summaries
- Department level adoption
- Self service performance (Virtual Agent and Service Portal)
- User search analysis
- Value insights: time saved through summarization and content generation
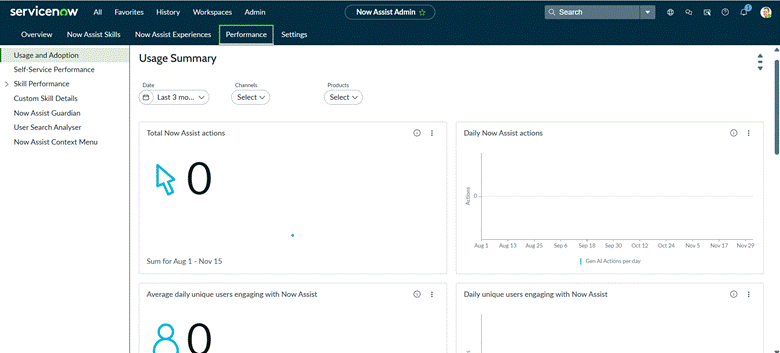
You can also create custom reports to prove the value of AI to stakeholders.
Recommended approach
Activate one or two skills that address your most immediate use cases, then monitor adoption and performance before expanding. A suggested path:
- Access requirements: identify which skills match business needs and user pain points.
- Configure access: set up the right roles and ACLs before activation.
- Test thoroughly: validate configurations in a non-production environment.
- Train users: show people how to use the AI capabilities effectively.
- Monitor usage: track metrics to understand adoption and spot issues.
- Iterate and improve: refine configuration using user feedback and performance data.
Troubleshooting common issues
| Scenario | What to check or do |
| A skill is not visible | Check user roles, activation status and market type (commercial or regulated). |
| ACL sync warning or notification | Select Sync roles when prompted to align Define access with Select display. |
| Role mismatch error | Review the modal showing the missing roles, then select Sync roles to add them to the ACL so those users can access the skill. |
| The panel is not appearing | For Employee Center Pro Plus the panel is disabled by default. Enable it in Settings. |
| Model provider issues | Verify the provider selected under Manage LLMs in Settings. |
Quick tips
- Activate only the AI skills your organization actively uses.
- Monitor API usage if you use BYOK, to manage costs.
- Review ACLs regularly to confirm they remain appropriate.
- Use Guardian features to maintain AI quality and safety.
Getting help
- ServiceNow Product Documentation: official configuration steps.
- ServiceNow Community: connect with other administrators and share solutions.
- ServiceNow Support: log cases for issues that need investigation.
- Release notes: stay updated on new features and known issues.
Key takeaways
The Admin Console is the main tool for managing the full lifecycle of Now Assist: install plugins, activate skills, govern access and models, then monitor and improve. Start small, secure access first, and let the analytics guide what you expand next.