
1. What is a Widget Catalog Variable?
A widget catalog variable is a catalog variable configured to display a Service Portal widget within a Catalog Item. It allows developers to add a custom or interactive interface to a catalog form when standard variable types do not provide the required presentation or behaviour.
2. Why and When Do We Use It?
Why do we use it?
We use a widget catalog variable when a Catalog Item needs to display dynamic information or provide an interactive experience that cannot be achieved easily with standard catalog variables.
When is it useful?
- When information needs to change based on values selected elsewhere on the catalog form.
- When the form needs a custom banner, status card, or richer user interface.
- When users need contextual information before submitting a request.
Example: In a Request New Laptop Catalog Item, a widget can display the number of laptops available for the selected model and office location.
3. Available Variable Types
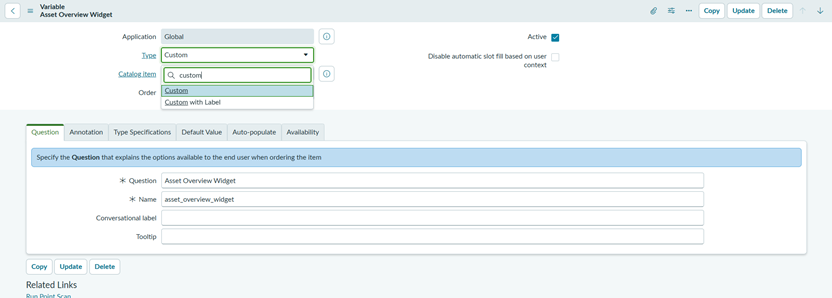
The variable types used to embed a widget are Custom and Custom with Label. These were previously labelled Macro and Macro with Label.
| Variable type | Display behaviour | Typical use |
| Custom | Displays the widget without a standard question label above it. | When the widget already contains its own heading, banner, or explanatory text. |
| Custom with Label | Displays the text entered in the Question field above the widget. | When the widget should have a label aligned with standard catalog variables. |
4. Real-World Use Case: My Assigned Assets
Consider a Request New Laptop Catalog Item. Before submitting the request, an employee should be able to review the company assets already assigned to them. This helps avoid unnecessary or duplicate laptop requests.
The widget identifies the logged-in employee on the server, retrieves the matching records from the alm_asset table, and displays the asset name or model, asset tag, serial number, and status. If no assets are assigned, it displays: “No assets are currently assigned to you.”

5. Deciding Which Variable Type to Select
After understanding the use case, decide how the widget should appear to the user. The choice depends on whether the widget needs a separate catalog question label.
| Requirement | Select | Reason |
| The widget already displays its own title or heading. | Custom | A separate Question label is not required. |
| The widget needs a standard label above it. | Custom with Label | The Question field is displayed above the widget. |

Decision for this use case: Use Custom because the Stock Checker displays its own status message and does not require an additional question label. If the design required a standard label above the widget, Custom with Label would be appropriate.
6. Prerequisites
- The Request New Laptop Catalog Item must already exist (Catalog: Service Catalog, Category: Laptops).
- The Service Portal widget to be embedded must already be created and saved before it can be selected.
- Asset records must exist in the alm_asset table with the Assigned to field populated.
- The target Service Portal experience must support the widget.
- Test users must be available: one employee with assigned assets and one without.
Note: Before building, confirm in your instance that the alm_asset table contains the fields assigned_to, asset_tag, model, serial_number, and install_status (Status). The location of the Widget field on the variable form can vary by ServiceNow release. It may appear under Type Specifications or the Default Value tab.
7. How to Implement My Assigned Assets
The implementation has two parts: first, create and configure the widget; then, attach the widget to a catalog variable on the Catalog Item.
7.1 Create the Service Portal Widget
- Open Service Portal > Service Portal Configuration > Widgets. Select New to create a widget record.
- Enter the widget details. Set Name to My Assigned Assets and ID to my-assigned-assets.
- Save the record. The widget form then shows the Body HTML template, CSS, Client controller, and Server script fields.
Implement the widget scripts in the following order.
7.2 HTML Template – Display the Assets
Enter the following in the Body HTML template field.
<div class=”panel panel-default assets-widget”>
<div class=”panel-heading”>
<h4 class=”panel-title”>My Assigned Assets</h4>
</div>
<div class=”panel-body”>
<p ng-if=”!data.assets.length”>No assets are currently assigned to you.</p>
<div class=”table-responsive” ng-if=”data.assets.length”>
<table class=”table table-striped”>
<thead>
<tr>
<th>Asset / Model</th>
<th>Asset Tag</th>
<th>Serial Number</th>
<th>Status</th>
</tr>
</thead>
<tbody>
<tr ng-repeat=”asset in data.assets”>
<td>{{asset.name}}</td>
<td>{{asset.tag}}</td>
<td>{{asset.serial}}</td>
<td>{{asset.status}}</td>
</tr>
</tbody>
</table>
</div>
</div>
</div>
The HTML Template checks data.assets.length. When the list is empty, it displays the empty-state message. Otherwise, ng-repeat creates one table row for each asset.
7.3 Server Script – Retrieve the Assigned Assets
Enter the following in the Server script field.
(function() {
data.assets = [];
var asset = new GlideRecordSecure(‘alm_asset’);
asset.addQuery(‘assigned_to’, gs.getUserID());
asset.orderBy(‘asset_tag’);
asset.query();
while (asset.next()) {
data.assets.push({
name: asset.getDisplayValue(‘model’) || asset.getDisplayValue(‘display_name’),
tag: asset.getValue(‘asset_tag’),
serial: asset.getValue(‘serial_number’),
status: asset.getDisplayValue(‘install_status’)
});
}
})();
The Server Script runs on the server when the widget loads. gs.getUserID() returns the sys_id of the logged-in user, so the browser cannot supply a different user. GlideRecordSecure applies the table ACLs, so only records the user is permitted to read are returned. getDisplayValue() returns readable text for reference and choice fields such as model and status. Each record is added to data.assets, which the HTML Template reads.
7.4 Client Controller and CSS
The first version needs no client-side logic, so keep the default Client controller.
api.controller = function() {
/* widget controller */
var c = this;
};
Enter the following in the CSS field.
.assets-widget {
margin-bottom: 15px;
}
.assets-widget .table {
margin-bottom: 0;
}
.assets-widget th {
white-space: nowrap;
}
7.5 Save the Widget
- Review the widget fields. Confirm that the HTML Template, Server Script, Client Controller, and CSS have been entered in their respective fields.
- Save the widget. Save or update the widget record before attaching it to the Catalog Item.
7.6 Create the Catalog Variable
- Open the Catalog Item. Navigate to Service Catalog > Catalog Definitions > Maintain Items. Open Request New Laptop and locate the Variables related list.
- Create a new variable. Select New in the Variables related list.
- Select the variable type. Choose Custom, based on the decision in Section 5.
- Enter the variable details. Set the Name to asset_overview_widget and the Order to 100. Since Custom is selected, a standard Question label is not required; if the form asks for a Question value, enter My Assigned Assets.
7.7 Attach the Service Portal Widget
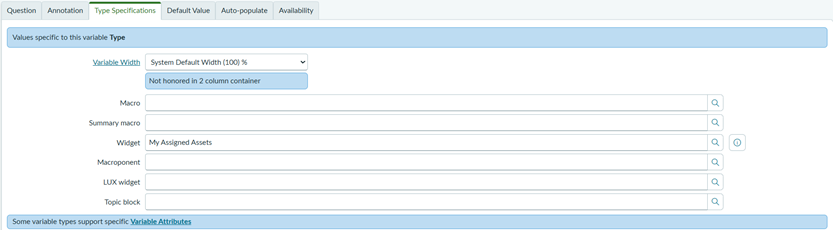
- Open the applicable configuration tab. Select Type Specifications or Default Value, depending on the ServiceNow release.
- Select the widget. Use the lookup icon beside the Widget field and select My Assigned Assets.
- Save the variable. Select Submit or Update to save the variable and its widget association.
7.8 Order the Remaining Variables
Make sure the other variables have a higher Order value than the widget, as listed in Section 4 (request_reason 200, laptop_model 300, office_location 400, additional_details 500). The widget has the lowest order, so it appears first.
8. Testing and Expected Result
Open the Request New Laptop Catalog Item in the intended Service Portal and test the following:
| Test | Action | Expected result |
| 1. Employee with assets | Open the item as an employee who has assigned assets. | All assigned assets are listed. |
| 2. Widget placement | Open the item in Service Portal. | The widget appears above all other variables. |
| 3. Asset information | Compare the widget with the records in alm_asset. | Asset name/model, tag, serial number, and status match. |
| 4. User security | Open the item as two different employees. | Each employee sees only their own assets. |
| 5. Employee without assets | Open the item as an employee with no assigned assets. | “No assets are currently assigned to you.” is displayed. |

- Impersonated a user with no asset

9. Important Considerations and Best Practices
- Identify the user on the server: Use gs.getUserID() in the Server Script. Never accept a user ID from the browser.
- ACLs: GlideRecordSecure enforces read access on alm_asset. If a standard employee cannot read their own assets, the widget shows the empty message even when assets are assigned, so verify the ACL behaviour with a real employee account.
- Create the widget first: Save the Service Portal widget before selecting it in the catalog variable.
- Display only: A Custom variable displays content and does not store a value on the request.
- Portal and Now Mobile: A widget selected through the Widget field is intended for supported Service Portal and Now Mobile experiences. Test in Service Portal, not only in the platform UI.
- Release differences: The location of the Widget field and related configuration tabs may vary by release.
10. Summary
Custom and Custom with Label variables allow a Service Portal widget to be embedded in a Catalog Item. Choose Custom when the widget provides its own heading, or Custom with Label when a standard question label is required. In the My Assigned Assets example, the Server Script retrieves the logged-in employee’s assets from alm_asset, the HTML Template displays them, and the widget is attached to the asset_overview_widget variable at the top of the Request New Laptop item. The final step is to verify the behaviour in the intended Service Portal.