
A Beginner-Friendly Step-by-Step Guide with a Practical Incident Management Example
1. Introduction
Artificial Intelligence is changing how users interact with enterprise platforms. Instead of navigating multiple forms and modules manually, users can ask an AI assistant to retrieve information and perform supported actions through connected tools.
The Model Context Protocol (MCP) provides a standardized way for AI applications to communicate with external systems and use their tools and data.
In this hands-on project, I configured a ServiceNow MCP server and connected it to Claude AI. The objective was to allow Claude to retrieve incident information from ServiceNow using two custom tools.
The project demonstrates how ServiceNow data can be accessed through natural-language requests while retaining ServiceNow authentication and access controls.
What we will build
By the end of this guide, you will have:
- A custom Scripted REST API in ServiceNow.
- Two MCP tools: Get Incident and Search Incidents.
- An MCP server configured in ServiceNow MCP Server Console.
- An OAuth-enabled connection to Claude AI.
- A working test that retrieves active incidents through Claude.
2. Understanding the Architecture
Before starting the configuration, it is important to understand how the components work together.
The request flow:
User → Claude AI → MCP Client → ServiceNow MCP Server → MCP Tool → Scripted REST API → Incident Table
When a user asks Claude to search for active incidents, Claude can select the Search Incidents tool. The MCP server exposes that tool, and the configured REST API retrieves the incident data from ServiceNow. The result is returned to Claude and presented in a readable format.
Key components
ServiceNow MCP Server Console: Used to create an MCP server and configure the tools it exposes.
Scripted REST API: Provides custom HTTP endpoints and server-side scripts to retrieve incident information.
MCP Tool: Makes an operation available to the AI client with a defined name, description, and input parameters.
OAuth 2.0: Provides an authorization mechanism for the client to connect securely.
Claude AI: Acts as the AI client that selects and invokes the available tools based on the user’s request.
3. Prerequisites
Before beginning, ensure you have:
- Access to a ServiceNow instance.
- The required permissions to create Scripted REST APIs and configure MCP servers.
- Access to ServiceNow MCP Server Console.
- Access to Claude AI with custom connector functionality available.
- At least one incident record for testing.
- An understanding of basic REST API concepts.
Menu names and available features may differ depending on your ServiceNow release, installed plugins, and assigned roles.
4. Step 1 — Create a Scripted REST API
The first step is to create REST endpoints that can retrieve incident information.
4.1 Open Scripted REST APIs
- Log in to your ServiceNow instance.
- Use the Application Navigator to search for Scripted REST APIs.
- Open the Scripted REST APIs module.
- Click New.
- Create a new API with the following details.
| Field | Example value |
| Name | TS Incident API |
| API ID | ts_incident_api |
| API namespace | Use the namespace generated or assigned by your instance |
| Description | Custom API for retrieving and searching incidents |
Save the record.
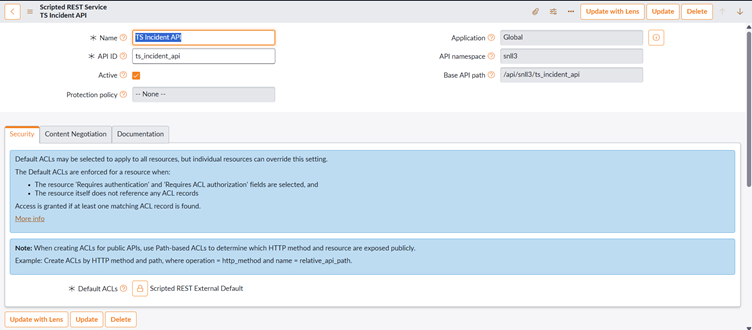
The API namespace and API ID form part of the API’s base path. Use the actual path generated by your instance when configuring the resources.
5. Step 2 — Create the Get Incident REST Resource
This endpoint retrieves one incident using its incident number.
5.1 Create the resource
Within your Scripted REST API, open the Resources related list and click New.
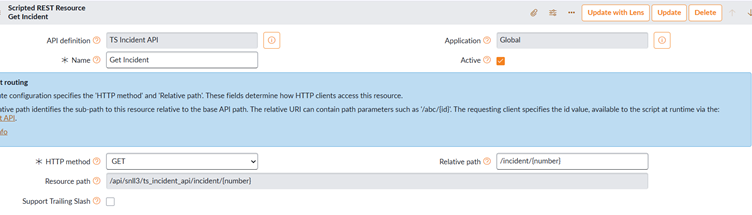
Configure the resource:
| Field | Value |
| Name | Get Incident |
| HTTP method | GET |
| Relative path | /incident/{number} |
| Description | Retrieves an incident by incident number |
5.2 Add the script
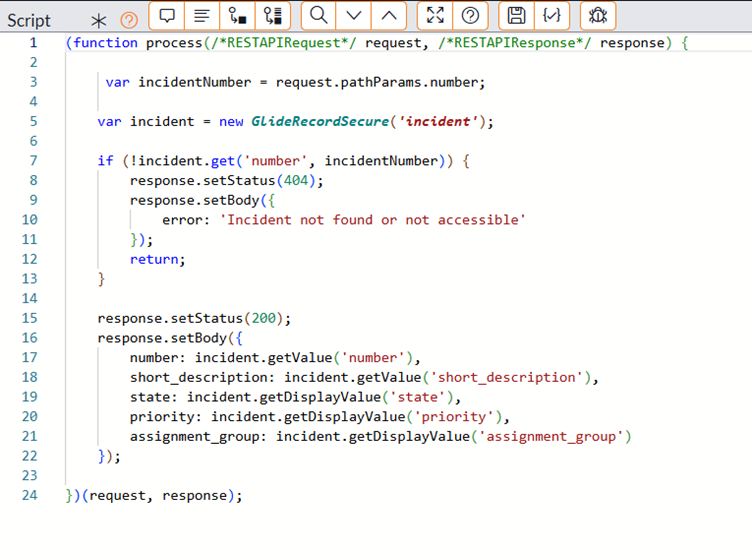
Use the following example script:
Save the resource.
5.3 How the script works
- request.pathParams.number reads the incident number from the URL.
- GlideRecordSecure(‘incident’) accesses the Incident table while applying record-level security checks.
- The get() method searches for the requested incident.
- If the record cannot be found or accessed, the script returns a 404 response.
- If the record is found and readable, the script returns selected incident fields in JSON format.
Using GlideRecordSecure is helpful for enforcing access controls, but it does not replace proper API authentication, authorization, and testing.
6. Step 3 — Create the Search Incidents REST Resource
The second endpoint retrieves a list of active incidents.
6.1 Create the resource
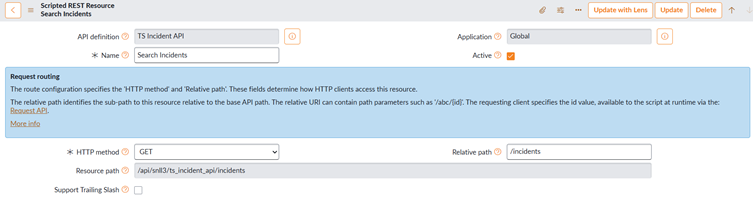
Create another resource under the same Scripted REST API.
| Field | Value |
| Name | Search Incidents |
| HTTP method | GET |
| Relative path | /incidents |
| Description | Retrieves the latest active incidents |
6.2 Add the script
Save the resource.
6.3 Explanation
- addActiveQuery() filters for active records.
- orderByDesc(‘sys_created_on’) sorts the results by creation time, newest first.
- setLimit(10) limits the result set to ten records.
- query() executes the query.
- The while loop builds an array containing the selected fields.
- response.setBody() returns the result as JSON.
Important: This example intentionally limits the output to ten records to keep the response manageable. The actual records returned depend on the user’s access and the data in the instance.
7. Step 4 — Configure MCP Tools
After creating the REST API resources, the next step is to expose them as MCP tools.
7.1 Open MCP Server Console
- Search for MCP Server Console in ServiceNow.
- Open the tool configuration area.
- Select the option to create a new tool.
- Choose the REST API category.
7.2 Configure the Get Incident tool
Use these example settings:
| Field | Value |
| Label | Get Incident |
| Name | get_incident |
| Category | REST API |
| REST API | Select your GET resource for /incident/{number} |
| Description | Retrieves an incident by its incident number |
| Active | Checked |
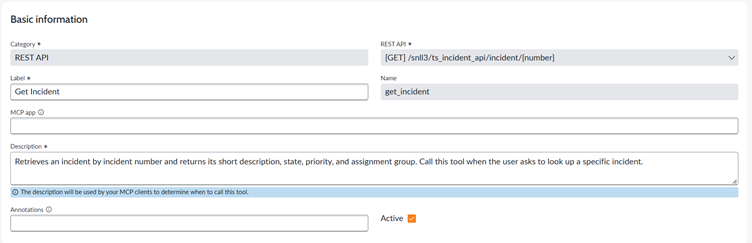
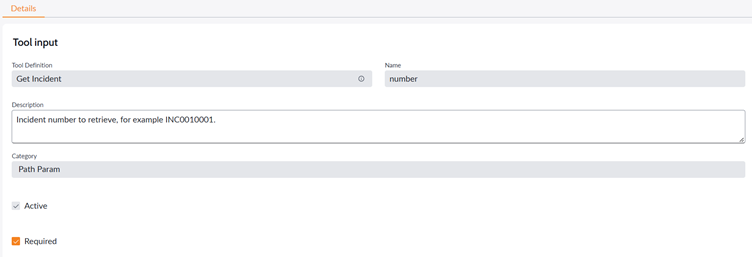
Under Tool Inputs, configure the following parameter:
| Field | Value |
| Name | number |
| Description | Incident number to retrieve, for example INC0010001 |
| Category | Path Param |
| Required | Checked |
| Active | Checked |
The number input is required because the REST endpoint expects the incident number in its path.
Save the tool.
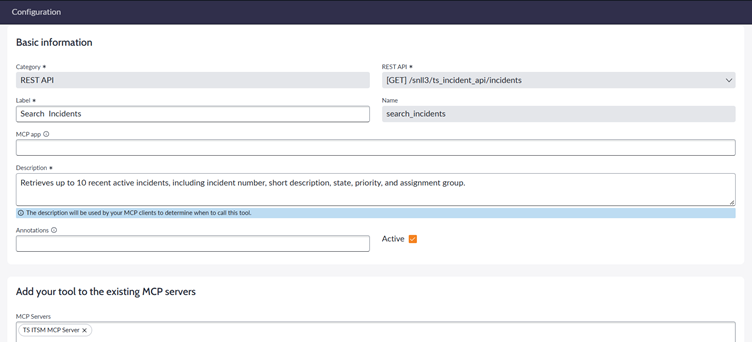
7.3 Configure the Search Incidents tool
Create another tool with these settings:
| Field | Value |
| Label | Search Incidents |
| Name | search_incidents |
| Category | REST API |
| REST API | Select your GET resource for /incidents |
| Description | Retrieves up to ten active incidents, newest first |
| Active | Checked |
This resource does not require a path parameter, so it is expected that no Tool Inputs appear for this tool.
Save the tool.
7.4 Why do we need MCP tools?
The REST API defines how the operation works in ServiceNow. The MCP tool exposes that operation to an MCP client with a name and description that the AI can understand.
For example, a user can ask Claude to retrieve an incident without manually constructing an HTTP request.
8. Step 5 — Create the MCP Server
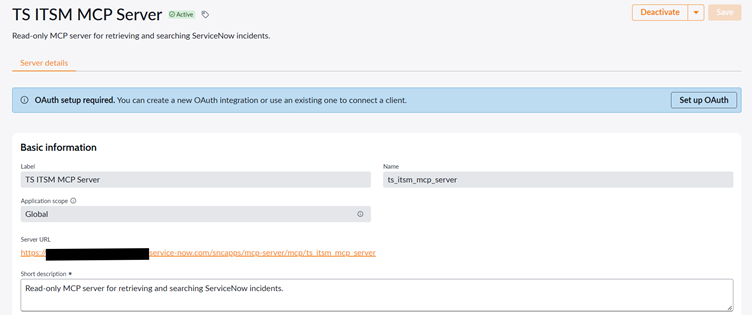
Now combine the tools into an MCP server.
- Open MCP Server Console.
- Navigate to Configuration → Servers.
- Select New or Create Server.
- Enter the following details.
| Field | Example value |
| Label | Talha ITSM MCP Server |
| Description | Read-only MCP server for retrieving and searching ServiceNow incidents |
| Active | Checked, if available |
- Add the Get Incident tool.
- Add the Search Incidents tool.

- Save the server.
- Open the saved server record.
- Locate and copy its Server URL.
Keep this URL available for the Claude configuration.
Important: Use the MCP server URL generated by ServiceNow. Do not substitute the ServiceNow homepage or the Scripted REST API endpoint.
9. Step 6 — Configure OAuth Authentication in ServiceNow
The MCP client must be authorized to access the server.
In this project, I used the ServiceNow Machine Identity Console’s inbound integration configuration for OAuth.
9.1 Open Inbound Integrations
- Search for Machine Identity Console.
- Open Inbound integrations.
- Select the option to create an integration.
- Configure the integration according to the OAuth options available in your ServiceNow release.
Example values used during the learning setup:
| Field | Example value |
| Name | Claude ServiceNow MCP |
| Provider name | Claude |
| Redirect URL | https://claude.ai/api/mcp/auth_callback |
| Auth scope | useraccount |
| Active | Checked |
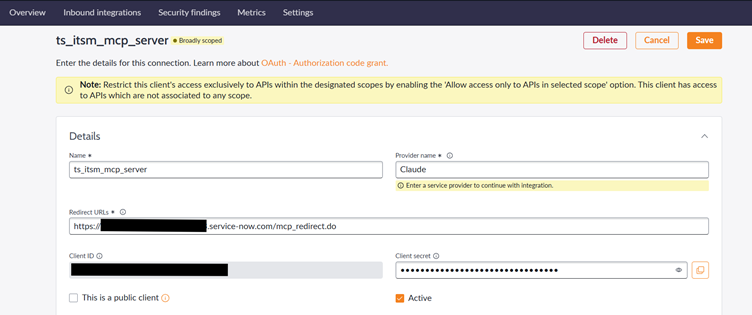
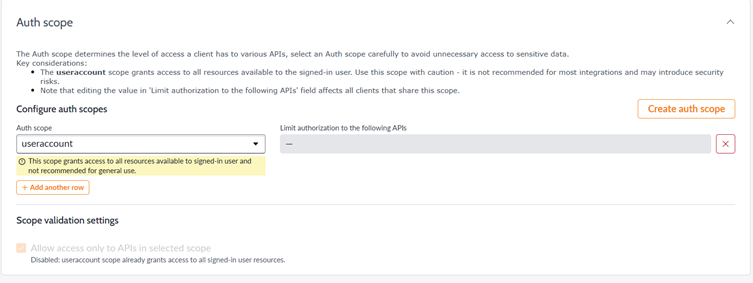
The redirect URL must match the OAuth callback used by the Claude client. If your setup requires additional callbacks, register them as appropriate.
9.2 OAuth client configuration
Depending on the ServiceNow release and the authentication method supported, the integration may provide a client ID and client secret.
- Save the inbound integration.
- Locate the generated Client ID.
- Securely store the Client Secret.
- Confirm the allowed scopes and API authorization settings.
- Verify the authentication flow and permissions before connecting Claude.
Note: OAuth configuration is environment-specific. Do not assume that the example scope is universally correct. Confirm the required scope and authorization settings for your ServiceNow instance.
Step 7 — Add the MCP Server to Claude
Once the MCP server URL and authentication configuration are ready, configure Claude.
Open Claude connectors
- Sign in to Claude.
- Navigate to Settings → Connectors, or the corresponding connector settings available in your account.
- Select Add custom connector.
- Enter the following details.
| Field | Value |
| Name | TS ITSM MCP Server |
| MCP Server URL | Paste the URL copied from ServiceNow |
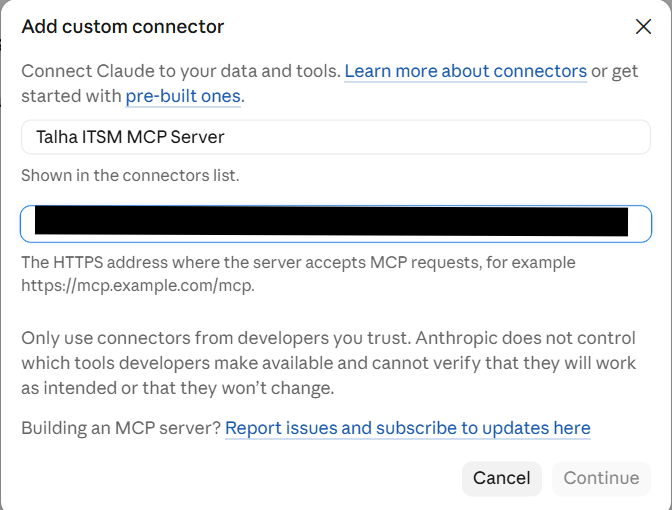
The connector name is only a display label. It does not have to match the ServiceNow server label.
Click Continue.
Configure authentication
Claude may detect the authentication configuration automatically. Review the available options.
Authentication
- Sign in now
- Sign in when needed
- No sign in
For an OAuth-protected ServiceNow server, use the appropriate sign-in option rather than disabling authentication.
OAuth client
- Use Claude’s published identity
- Register automatically
- Use your own auth client
Choose the option compatible with your ServiceNow OAuth configuration. For this learning setup, I used the custom OAuth client option with the credentials configured in ServiceNow.
If prompted, enter the Client ID and Client Secret generated by the integration. These fields may be optional in Claude’s interface, depending on the selected authentication flow.
Transport
- Streamable HTTP
- SSE
Select the transport supported by your ServiceNow MCP server. Streamable HTTP was the initial selection in this setup.
Click Add to save the connector.
Connect the server
- Locate the newly added connector in Claude.
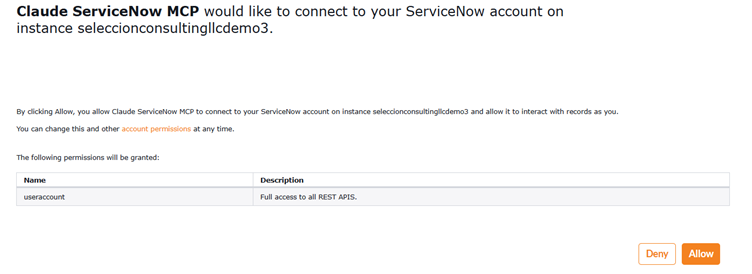
- Click Connect.
- Sign in to ServiceNow if prompted.
- Review and approve the authorization request if the permissions are appropriate.
- Return to Claude and confirm that the connector is connected.
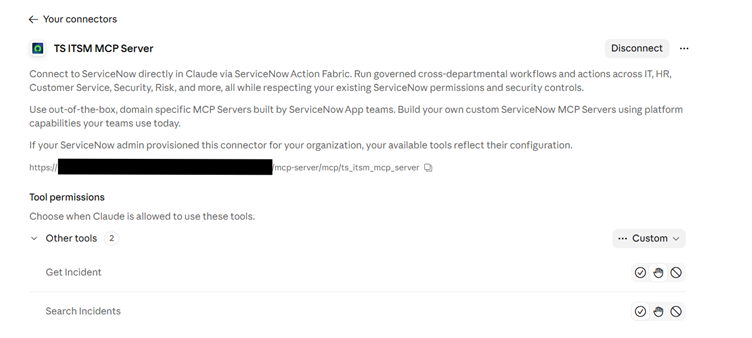
If the connection fails, check the server URL, OAuth callback, client credentials, authentication settings, transport, and network accessibility.
Step 8 — Test Search Incidents in Claude
After connecting the MCP server, open a new Claude conversation.
Ensure the connector is enabled for the conversation, then enter this prompt:
Test prompt:
“Use my TS ITSM MCP Server connector to call the Search Incidents tool. Retrieve the active ServiceNow incidents and display the incident number, short description, state, priority, and assignment group. Do not modify any records.”
Expected result
Claude should invoke the Search Incidents tool and display the incident records returned by ServiceNow.
In my test, Claude returned the latest ten active incidents, consistent with the limit configured in the Scripted REST API.
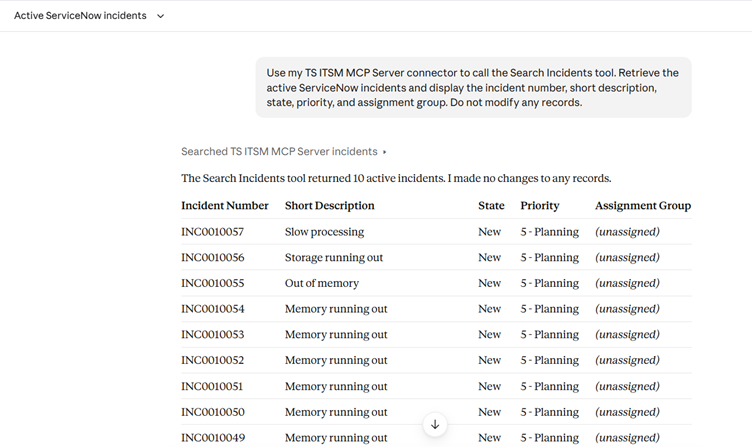
This confirmed that Claude could invoke the tool and retrieve data from ServiceNow.
Step 9 — Test Get Incident in Claude
Next, test the tool that retrieves one incident.
Use the incident number from the previous results.
Test prompt:
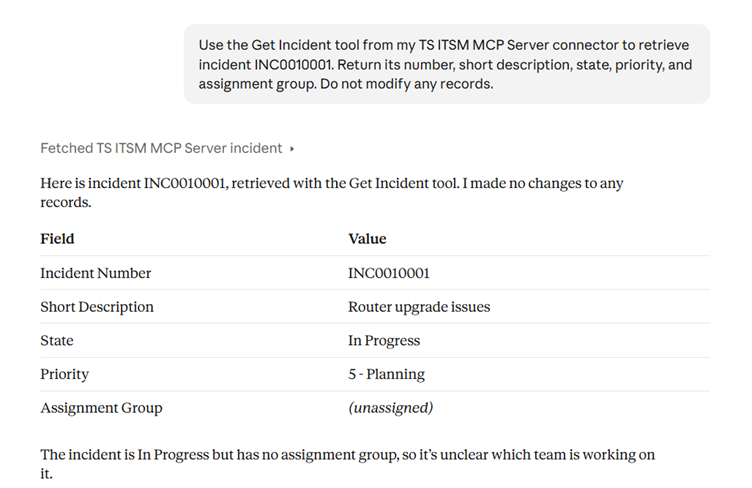
“Use the Get Incident tool from my TS ITSM MCP Server connector to retrieve incident INC0010001. Return its number, short description, state, priority, and assignment group. Do not modify any records.”
Replace INC0010001 with an actual incident number from your instance.
Result:
- Troubleshooting
| Issue | What to check |
| Custom API does not appear in REST API Explorer | Confirm the Scripted REST API and its resources are saved and active. Verify the API namespace, API ID, and permissions. |
| Search Incidents returns an error | Check the resource path, GET method, script, and access permissions. |
| Get Incident returns 404 | Verify the incident number and whether the record is accessible to the authorized user. |
| Claude cannot connect | Verify the MCP server URL, authentication flow, OAuth configuration, and supported transport. |
| Claude connects but tools are missing | Confirm both tools are active and attached to the intended MCP server. |
| Claude returns an authorization error | Review OAuth scopes, API permissions, roles, and record access. |
| Claude returns only ten incidents | Check the setLimit(10) statement in the Search Incidents script. |
- Security Best Practices
When connecting AI clients to enterprise platforms, security should be considered from the beginning.
- Use a test or development instance while learning.
- Grant only the permissions needed by the integration.
- Use GlideRecordSecure and test record-level access.
- Avoid exposing unnecessary incident fields or sensitive information.
- Never publish Client Secrets, access tokens, passwords, or private instance details.
- Review tool descriptions and the actual server-side scripts before allowing AI access.
- Start with read-only operations before introducing tools that create or update records.
- Test both successful and unsuccessful access scenarios.
- Review the permissions granted during the OAuth authorization process.
- Remember that connecting an MCP server can expose data or allow actions according to the configured tools and permissions.