
In ServiceNow, maintaining accurate and consistent data is an important part of building reliable applications.
But how do we make sure users enter the required information when working with records? And how do we maintain those rules when records are created or updated outside the normal form?
This is where UI Policies and Data Policies come into play.
Although both can control field attributes such as Mandatory and Read-only, they serve different purposes.
Let’s understand the difference through a practical Incident Management example.
1. Understanding the Business Scenario
Imagine an IT support team handling incidents.
The organization introduces the following requirement:
Whenever an incident has Critical priority, the Description field must be mandatory.
For example:
- A production server is unavailable.
- A payment gateway is not responding.
- A critical business application is down.
The support team wants users to provide a proper description before submitting a Critical incident.
But there is another concern.
What happens when an incident is created or updated through an import set instead of the normal ServiceNow form?
A UI Policy alone cannot enforce this requirement across non-form update channels.
This is where a Data Policy becomes useful.
For this demonstration, we’ll use the existing Incident table and its Description field. No custom fields or new applications are required.
2. What Is a UI Policy?
A UI Policy is a client-side configuration that dynamically controls the behaviour of fields on a form.
It can:
- Make fields mandatory.
- Make fields read-only.
- Show or hide fields.
- Apply changes when specified conditions are met.
One major advantage is that basic UI Policies can be configured without writing scripts.
Example:
Whenever the Incident priority is Critical, the Description field should become mandatory on the Incident form.
3. Creating the UI Policy
Let’s implement the requirement.
Navigation:
All → System UI → UI Policies
You can also search for UI Policies in the Application Navigator.
Configuration:
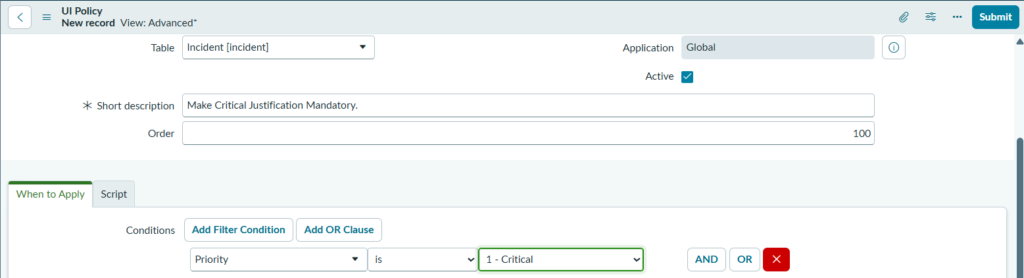
- Click New.
- Select the Table: Incident.
- Enter the Short description: Make Description Mandatory for Critical Incidents.
- Set Active to true.
- Under Conditions, configure:Priority | is | 1 – Critical
- Save the UI Policy.
Important: In standard Incident Management, priority can be calculated from Impact and Urgency. If your Priority field is not directly editable, use the appropriate Impact and Urgency values to produce Critical priority during testing.
4. Creating a UI Policy Action
A UI Policy condition determines when the policy runs. A UI Policy Action determines what happens to a particular field.
After saving the UI Policy:
- Open its UI Policy Actions related list.
- Click New.
- Select Description as the Field name.
- Set Visible to Leave alone.
- Set Mandatory to True.
- Set Read-only to Leave alone.
- Submit.
Now test the Incident form:
- Set the incident to Critical priority.
- The Description field should become mandatory.
- Change the priority to a non-critical value.
- The Description field should return to its original behaviour, provided Reverse if false is enabled.


5. What Is a Data Policy?
A Data Policy enforces data consistency beyond the normal form interface.
It can apply mandatory and read-only rules to records processed through supported non-form channels, such as import sets and web services.
Data Policies can:
- Make fields mandatory.
- Make fields read-only.
- Enforce conditions on records independently of the normal form interface.
However, Data Policies do not provide UI Policy features such as showing or hiding fields, and they do not support custom scripts.
Our example:
Even if a Critical incident is created through an import set, its Description should not be missing.
We can use a Data Policy to enforce this requirement.
6. Creating the Data Policy
Navigation:
All → System Policy → Rules → Data Policies
You can also search for Data Policies in the Application Navigator.
Configuration:
- Click New.
- Set the Table to Incident.
- Enter the Short description: Enforce Description for Critical Incidents.
- Set Active to true.
- Configure the condition:Priority | is | 1 – Critical
- Enable Apply to import sets if you want the policy to apply to import-set processing.
- Leave Use as UI Policy on client unchecked for this demonstration.
- Save the Data Policy.

7. Creating the Data Policy Rule
A Data Policy needs a Data Policy Rule to specify which field attributes it should enforce.
After saving the Data Policy:
- Open the Data Policy Rules related list.
- Click New.
- Select Description as the Field name.
- Set Mandatory to True.
- Set Read-only to Leave alone.
- Submit.
Now our Data Policy has a rule that makes Description mandatory whenever its condition is satisfied.

8. UI Policy vs Data Policy: What’s the Difference?
| Feature | UI Policy | Data Policy |
|---|---|---|
| Primary purpose | Form behaviour | Data consistency |
| Execution | Client-side | Server-side enforcement |
| Make fields mandatory | Yes | Yes |
| Make fields read-only | Yes | Yes |
| Show or hide fields | Yes | No |
| Custom scripting | Supported | Not supported |
| Apply to import sets | No | Yes, when configured |
| Apply to supported web services | Not by itself | Yes |
| Dynamic form behaviour | Yes | Optional, using Use as UI Policy on client |
Important: A Data Policy can also act like a UI Policy on the client when Use as UI Policy on client is enabled. This does not mean the two features are identical.
9. Can We Use Both Together?
Absolutely!
In fact, combining both can provide a better user experience and stronger data consistency.
For our Critical Incident example:
UI Policy:
- Detects when the incident becomes Critical.
- Makes the Description field mandatory immediately on the form.
- Helps users understand what information is required before submission.
Data Policy:
- Enforces the mandatory requirement on supported non-form update channels.
- Helps maintain data consistency when records are processed through import sets and supported integrations.
One improves the user experience; the other enforces the data requirement beyond the normal form.
10. Common Mistakes Developers Should Avoid
- Using only a UI Policy when the requirement must also apply to supported non-form update channels.
- Expecting a Data Policy to show or hide fields.
- Forgetting to create a Data Policy Rule after creating the Data Policy.
- Assuming Data Policies support custom scripts.
- Forgetting to configure Apply to import sets when import-set enforcement is required.
- Assuming that enabling Use as UI Policy on client replaces server-side enforcement.
- Assuming every server-side scripted update is automatically blocked by a Data Policy. Test the actual update mechanism and its configuration.
Conclusion
UI Policies and Data Policies may look similar because both can control field attributes, but their purposes are different.
A UI Policy helps guide users while they interact with a form.
A Data Policy helps enforce consistent data rules across supported ways of creating and updating records.
As a ServiceNow developer, understanding when to use each one is important for building reliable applications.
Remember: Don’t just guide users to enter correct data. Design your application to enforce data consistency too.