
Introduction
ServiceNow UI Builder provides a visual development environment that allows developers to create customized and interactive user experiences using reusable components, data resources, and event handlers.
In this practical guide, we will build an Incident Management Dashboard using ServiceNow UI Builder.
The dashboard will retrieve incident records from the Incident table and display them in individual cards. Each card will show the incident number, caller, short description, and priority.
We will also implement navigation functionality so that when a user clicks an incident card, the corresponding incident record opens on a separate page within the same experience.
By the end of this guide, you will learn how to:
- Create an Incident Management Dashboard.
- Configure an Incident Lookup data resource.
- Use a Repeater component to display multiple incident records.
- Bind incident fields to UI Builder components.
- Design reusable incident cards.
- Create a separate Incident Record page.
- Configure the Card Clicked event.
- Map the event to the newly created page.
- Pass the selected incident’s sys_id dynamically.
- Preview and test the completed dashboard.
1. Prerequisites
Before starting, ensure that you have:
- Access to a ServiceNow instance.
- Access to UI Builder.
- An existing experience or permission to create one.
- Access to the Incident table.
- Appropriate permissions to configure pages and event mappings.
2. Understanding the Dashboard Architecture
The dashboard will consist of the following components:
| Component | Purpose |
| Experience | Provides the application environment |
| Incident Dashboard | Main dashboard page |
| Incident Lookup | Retrieves incident records |
| Repeater | Dynamically generates incident cards |
| Card Base Container | Provides the card structure |
| Heading | Displays incident number |
| Label Value | Displays caller |
| Stylized Text | Displays short description |
| Highlighted Value | Displays priority |
| Incident Record Page | Displays the selected incident |
| Event Mapping | Handles card click navigation |
The implementation follows this structure:
Experience → Incident Dashboard → Incident Lookup → Repeater → Card Base Container → Incident Information.
When a card is clicked, the event mapping navigates the user to the Incident Record Page and passes the selected record’s identifier.
3. Creating the Incident Management Dashboard
Step 1: Open UI Builder
- Log in to your ServiceNow instance.
- Navigate to UI Builder.
- Open your Incident Management Experience.
- Navigate to the Pages section.

Step 2: Create the dashboard page
- Click the option to create a new page.
- Select an appropriate page template.
- Enter the page name as Incident Dashboard.
- Complete the page creation process.
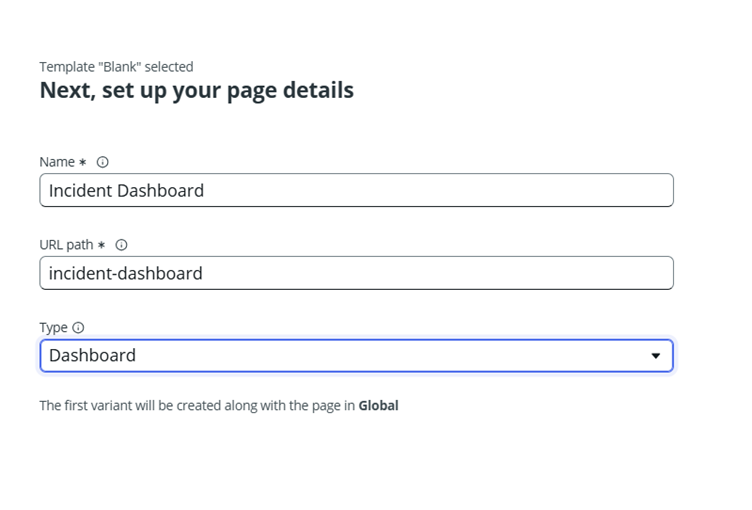
You should now have a blank dashboard page where you can add components.
4. Configuring the Incident Lookup Data Resource
A data resource retrieves records from a ServiceNow table and makes the returned data available to components.
For this implementation, we will use Incident Lookup.
Step 1: Add the data resource
- Open the Incident Dashboard.
- Locate the Data and scripts section on the left.
- Expand Data resources.
- Add the Incident Lookup data resource.
- Configure it to retrieve records from the Incident table.
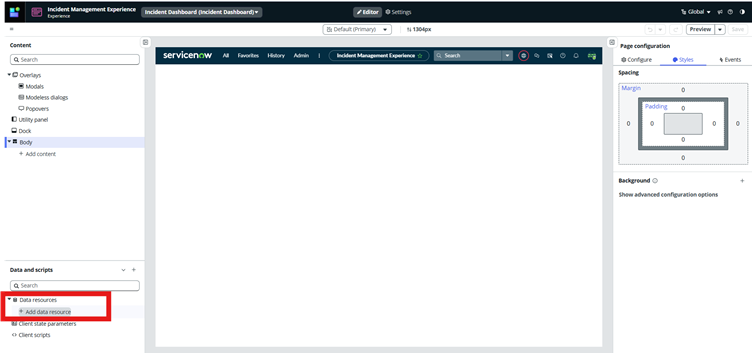
Step 2: Configure the data source
Configure the required table and query conditions.
| Property | Configuration |
| Data resource | Incident Lookup |
| Table | Incident |
| Table name | incident |
| Output | Incident records |
You can optionally add conditions to retrieve only active incidents.
Step 3: Verify the returned data
Execute or preview the data resource and verify that incident records are returned.
Check for fields such as:
- Number
- Caller
- Short description
- Priority
- Sys ID
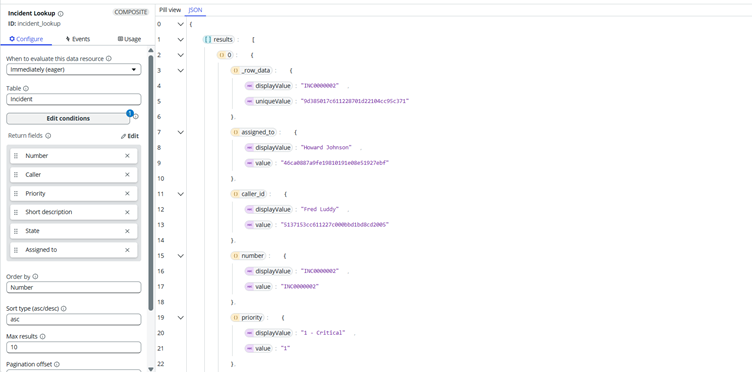
5. Adding and Configuring the Repeater
The Repeater component allows us to display multiple records using a single reusable component structure.
Instead of manually creating individual incident cards, the Repeater generates them based on the returned data array.
Step 1: Add a column layout
- Select Body in the Content panel.
- Click Add content.
- Search for Column layout.
- Add the required column layout.
- Add a column inside the layout.

Step 2: Add the Repeater
- Select the column.
- Click Add content.
- Search for Repeater.
- Add Repeater 1.

Step 3: Configure Repeater data
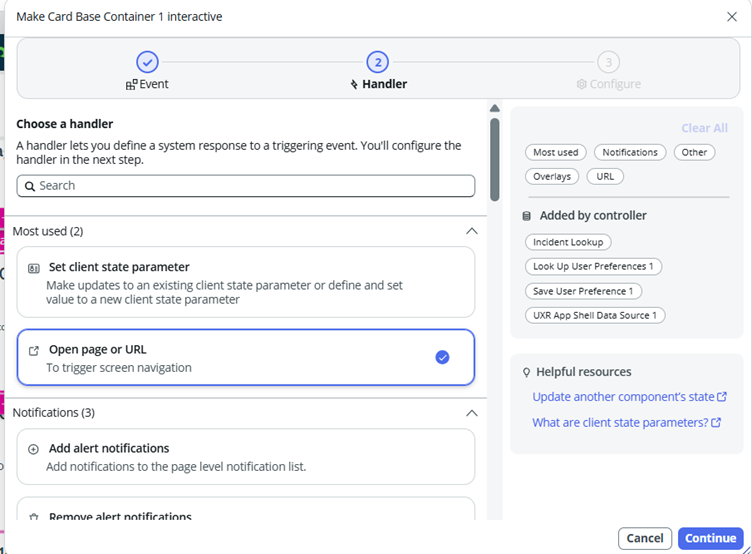
- Select Repeater 1.
- Open the Configure tab.
- Locate the Repeater data section.
- Find the Data array property.
- Click the Bind data icon.
- Select Data resource.
- Expand Incident Lookup.
- Select the results array.
- Click Apply.
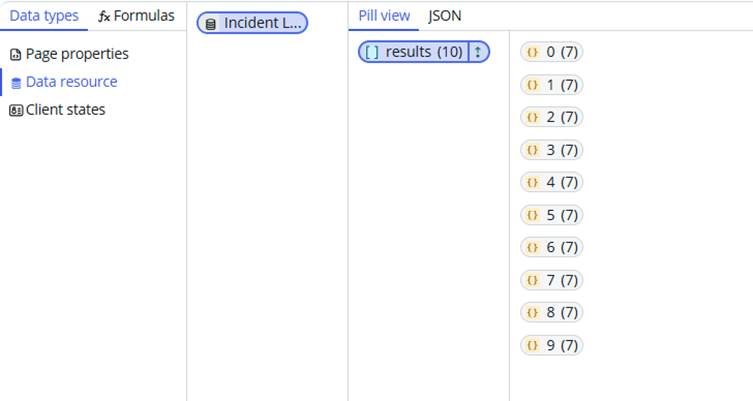
The Repeater is now connected to the incident records.
For example, if the data resource returns 10 records, the Repeater can generate 10 corresponding cards.
6. Creating and Designing Incident Cards
Step 1: Add Card Base Container
- Select Repeater 1.
- Click Add content.
- Search for Card Base Container.
- Add Card Base Container 1.
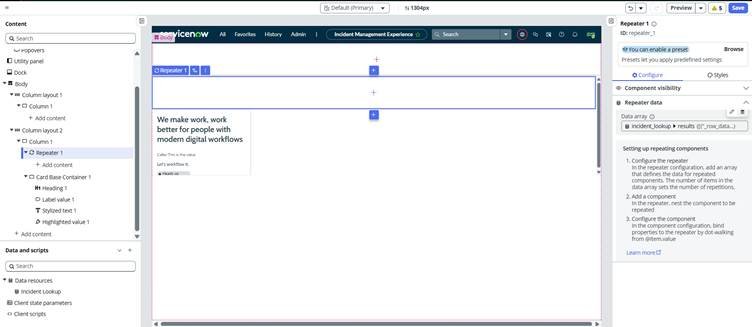
Step 2: Configure card interaction
- Select Card Base Container 1.
- Open the Configure tab.
- Locate the Interaction property.
- Select Click.
This enables click interaction on the card.
Step 3: Configure card dimensions
Open the Styles tab and configure:
| Property | Value |
| Width | 300 px |
| Height | 200 px |
| Padding | As required |
Adjust the dimensions according to your dashboard layout.
7. Binding Incident Information to Card Components
We will add four components inside the Card Base Container.
7.1 Heading – Incident Number
- Select Card Base Container 1.
- Click Add content.
- Search for Heading.
- Add Heading 1.
- Select the Heading component.
- Open Configure.
- Locate the Label property.
- Click Bind data.
- Select Repeater under Data types.
- Select value.
- Expand the incident number field.
- Select displayValue.
- Click Apply.
The card will display the incident number dynamically.
Example: INC0000002.
7.2 Label Value – Caller
- Select Card Base Container 1.
- Add a Label Value component.
- Select the component.
- Open Configure.
- Locate its value property.
- Click Bind data.
- Navigate to Repeater → value.
- Expand the caller_id field.
- Select displayValue.
- Click Apply.
The caller’s name will now appear on the card.
7.3 Stylized Text – Short Description
- Select Card Base Container 1.
- Add a Stylized Text component.
- Select the component.
- Open Configure.
- Locate the Text property.
- Click Bind data.
- Select Repeater.
- Select value.
- Expand short_description.
- Select displayValue.
- Click Apply.
This displays the incident short description dynamically.
7.4 Highlighted Value – Priority
- Select Card Base Container 1.
- Add a Highlighted Value component.
- Select the component.
- Open Configure.
- Locate the value property.
- Click Bind data.
- Navigate to Repeater → value.
- Expand priority.
- Select the appropriate display value.
- Click Apply.
The incident priority will now appear on the card.
Example: 1 – Critical.
Note: The exact field paths depend on the data resource response. Verify the available fields in the data picker before applying the bindings.
8. Creating a Separate Incident Record Page
Now that the dashboard displays incident records, we need another page to display the complete details of an individual incident.
Instead of navigating to an unrelated page, we will create a separate record page within the same experience.
Step 1: Return to the Experience overview
- In UI Builder, locate your experience name in the upper-left corner.
- Click the experience name.
- Navigate back to the Experience overview.
- Locate the Pages section.
Step 2: Create a new page
- Click the plus (+) icon in the Pages section.
- You will see the available page creation options.
- Select Create a new page.
Important: Select Create a new page instead of Add a variant to page.
A page variant creates an alternative version of an existing page, whereas we need a separate destination page for displaying individual incident records.
Step 3: Select the page template
- Browse the available page templates.
- Locate the Standard Record template.
- Select Use template.
The Standard Record template provides a starting point for creating a page that displays record information.
Step 4: Configure page details
Enter the following information:
| Property | Value |
| Page name | Incident Record Page |
| Purpose | Display individual incident details |
| Template | Standard Record |
- Click Continue.
- Review the page configuration.
- Select Looks Good.
- Click Create.
The Incident Record Page is now created within your experience.
Step 5: Verify page creation
- Return to the Experience overview.
- Open the Pages section.
- Verify that Incident Record Page appears in the list.
- Open the page and review its configuration.
At this point, we have two pages:
- Incident Dashboard – Displays multiple incident cards.
- Incident Record Page – Serves as the destination for the selected incident.
9. Configuring Card Click Event Mapping
This is the most important part of the implementation.
We want the application to identify which incident card was clicked and navigate to the Incident Record Page with the correct record identifier.
For this, we will configure an event mapping on the Card Base Container.
Step 1: Return to Incident Dashboard
- Navigate back to the Experience overview.
- Open Incident Dashboard.
- In the Content panel, expand the component hierarchy.
Navigate to:
Body → Column Layout 2 → Column 1 → Repeater 1 → Card Base Container 1.
- Select Card Base Container 1.
Step 2: Open the Events tab
- Locate the right-side configuration panel.
- Select the Events tab.
- Click Add event mapping.
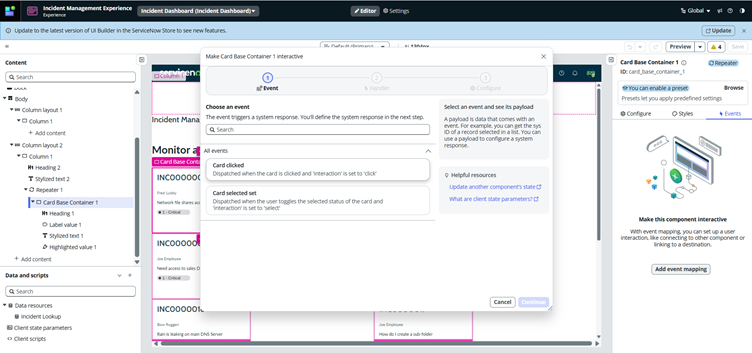
Step 3: Select the component event
- Browse the available component events.
- Select Card clicked.
- Click Continue.
This event will be triggered when the user clicks an incident card.
Step 4: Select the event handler
- Select Open page or URL as the event handler.
- Click Continue.
- Select Pages in current experience.
- Choose Incident Record Page.

This connects the card click event to the separate page we created earlier.
Step 5: Configure destination parameters
The destination page needs to know which incident record should be displayed.
Configure the following parameters:
| Parameter | Value |
| Table | incident |
| sysId | Dynamically bound incident identifier |
Table configuration:
Enter:
incident
sysId configuration:
The sysId must be dynamically populated based on the incident card clicked by the user.
Step 6: Bind the sysId dynamically
Follow these steps:
- Locate the sysId field in the destination configuration.
- Hover over the field.
- Click the Bind data icon.
- In the data picker, select Repeater under Data types.
- Open Pill view.
- Select value.
- Expand _row_data.
- Locate uniqueValue.
- Double-click uniqueValue.
- Click Apply.
The expected binding path is:
Repeater → value → _row_data → uniqueValue
Why is this binding important?
Each incident card represents a different incident record.
The uniqueValue identifies the individual record represented by the current Repeater item.
For example:
- Clicking INC0000002 passes the identifier of INC0000002.
- Clicking INC0000003 passes the identifier of INC0000003.
- Clicking INC0000007 passes the identifier of INC0000007.
Without dynamic binding, the application might navigate using a static or incorrect record identifier.
Step 7: Complete the event mapping
- Review the selected destination page.
- Verify that the table is set to incident.
- Verify that sysId uses the Repeater’s dynamic uniqueValue binding.
- Configure the Open in new tab option according to your requirement.
- Click Add to complete the event mapping.
The Card Base Container is now configured to navigate to the Incident Record Page when clicked.
10. Saving and Testing the Dashboard
After completing the configuration, save the changes and test the implementation.
Step 1: Save the configuration
- Click Save in UI Builder.
- Wait for the changes to be saved.
- Click Preview.
Step 2: Verify incident cards
Check that each card displays:
- Incident number
- Caller name
- Short description
- Priority
Verify that the information is displayed correctly for different records.
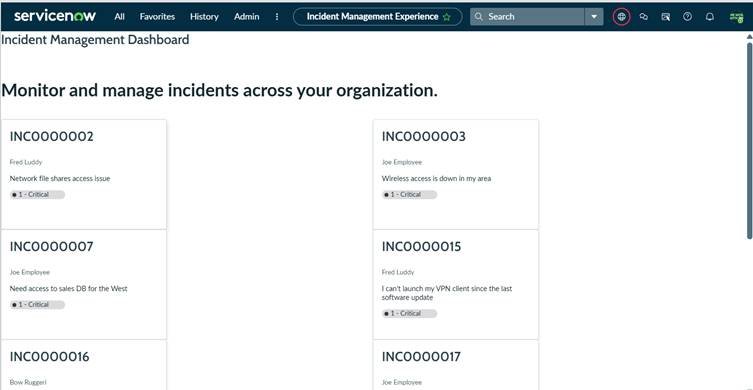
Step 3: Test card navigation
- Click the first incident card.
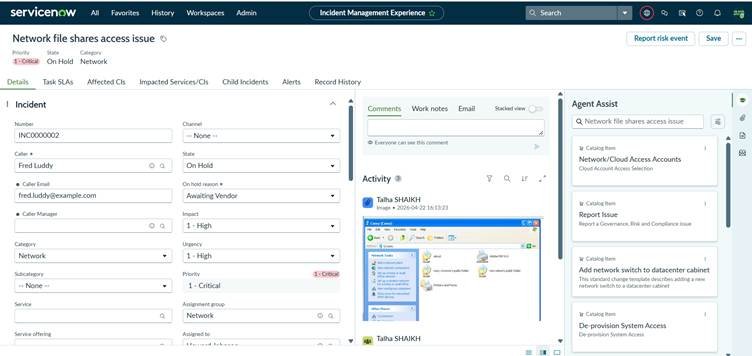
- Verify that Incident Record Page opens.
- Check whether the correct incident details are displayed.
- Return to Incident Dashboard.
- Click another incident card.
- Verify that the corresponding incident record opens.
Expected result
| Selected Card | Expected Destination |
| INC0000002 | Record for INC0000002 |
| INC0000003 | Record for INC0000003 |
| INC0000007 | Record for INC0000007 |
| INC0000015 | Record for INC0000015 |
Every card should navigate to its own incident record.
11. Best Practices
1. Use Repeater for dynamic records
Avoid manually creating individual cards for every incident. A Repeater makes the dashboard easier to maintain.
2. Use dynamic data binding
Bind the component properties to the Repeater data instead of entering static values.
3. Maintain consistent card dimensions
Use consistent width, height, and spacing to create a clean dashboard.
4. Pass the correct record identifier
Always verify that the selected card passes its own sys_id to the destination page.
5. Test multiple records
Test different incident cards to ensure that navigation works correctly.
6. Consider responsive layouts
Test your dashboard at different viewport widths to ensure that cards remain readable.
12. Conclusion
In this practical implementation, we created an interactive Incident Management Dashboard using ServiceNow UI Builder.
We configured an Incident Lookup data resource to retrieve incident records and used a Repeater to display them dynamically in reusable cards.
We added components to display incident numbers, caller names, short descriptions, and priorities using data binding.
We then created a separate Incident Record Page using the Standard Record template and configured the Card Clicked event on the Card Base Container.
Finally, we mapped the event to the newly created page and passed the selected incident’s unique identifier dynamically using the Repeater’s uniqueValue.
This implementation demonstrates how UI Builder components, data resources, Repeaters, and event mappings can work together to create an interactive, data-driven ServiceNow experience with minimal scripting.
Happy Learning and Happy Building!