
1. Objective
To understand how auto assignment works in ServiceNow and explore different approaches to automatically assign records to the appropriate assignment groups based on predefined conditions or user selections.
2. What is Auto Assignment?
Auto assignment is a process in ServiceNow that automatically assigns records, such as Incidents, to the appropriate assignment group or individual based on specific conditions.
For example, when an Incident is created with the Category set to Hardware, ServiceNow can automatically assign it to the Hardware Support group.
This reduces manual effort and ensures that records reach the appropriate teams.
3. Why is Auto Assignment Required?
In an organization, different teams handle different types of issues. If every record is manually assigned, it can increase the time required to process records and may lead to incorrect assignments.
Auto assignment helps to:
- Reduce manual assignment efforts.
- Route records to the appropriate support teams.
- Improve response and resolution time.
- Maintain consistency in record assignment.
4. How Does Auto Assignment Work?
Auto assignment works by checking predefined conditions and assigning records to the appropriate group or user when those conditions are satisfied.
For example:
| Condition | Assignment Group |
| Category = Hardware | Hardware Support |
| Category = Software | Software Support |
| Category = Network | Network Support |
ServiceNow provides different ways to implement this functionality depending on the requirement.
5. Approaches Used for Auto Assignment
In this document, we will explore three approaches:
- Assignment Rules: Automatically assign records based on predefined conditions.
- onChange Client Script: Populate the Assignment Group field immediately when a particular field value changes on the form.
- GlideAjax: Retrieve server-side information through a Script Include and use it to populate the Assignment Group field on the client side.
Each approach will be implemented using a practical scenario to understand how and when it can be used.
6. Approach 1: Auto Assignment Using Assignment Rules
What is an Assignment Rule?
Assignment Rules are server-side rules in ServiceNow that automatically assign records to a user or assignment group based on predefined conditions.
Scenario: Automatically assign Hardware incidents to the Hardware group.
Prerequisite: Ensure that the Hardware assignment group already exists in ServiceNow.
Implementation:
- Navigate to System Policy → Rules → Assignment Rules.
- Click New and configure the following:
- Name: Assign Hardware Incidents
- Table: Incident
- Condition: Category is Hardware
- Assignment Group: Hardware
- Active: Checked
- Save the Assignment Rule.
Expected Result:
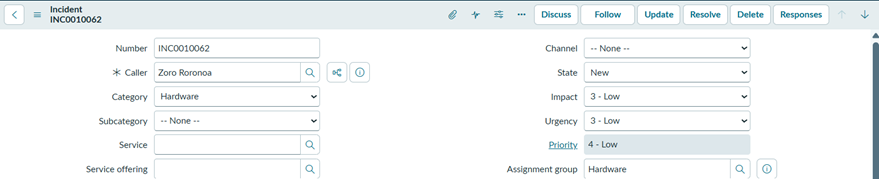
When an Incident with the Category set to Hardware is submitted, ServiceNow automatically assigns it to the Hardware group.
Note: Assignment Rules can also automatically populate the Assigned To field based on predefined conditions, provided the selected user is appropriate for the assignment.
Assignment Rule Config:

Output:
7. Approach 2: Auto Assignment Using onChange Client Script
What is an onChange Client Script?
An onChange Client Script executes whenever the value of a specified field changes on a form.
Scenario: When a user selects a Configuration Item (CI) on an Incident, the Assignment Group should automatically populate based on the Support Group configured on that CI.
Prerequisite: Ensure that the CI records have a support_group field referencing the User Group table (sys_user_group) and that it contains the appropriate support group.
Implementation:
- Navigate to System Definition → Client Scripts and click New.
- Configure the following:
- Name: Auto Assign Group Based on CI
- Table: Incident
- Type: onChange
- Field name: Configuration Item (cmdb_ci)
- UI Type: All
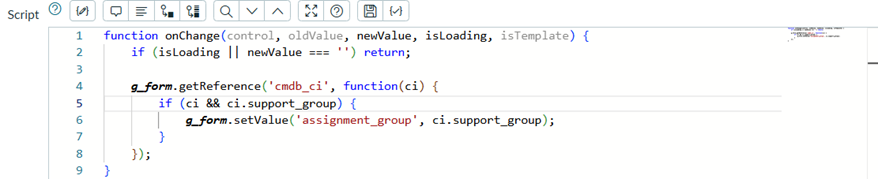
- Add the following script:
- Save the Client Script.
How does it work?
The g_form.getReference() API retrieves the selected reference record from the server and makes its fields available through a callback function.
In this example:
- getReference(‘cmdb_ci’) retrieves the selected Configuration Item record.
- ci.support_group accesses the Support Group configured on that CI.
- g_form.setValue() populates the Incident’s Assignment Group field.
This allows a Client Script to use server-side record information without directly querying the database.
Expected Result:
When a user selects a Configuration Item, its configured Support Group automatically populates the Assignment Group field on the Incident form.

Output:

8. Approach 3: Auto Assignment Using GlideAjax
What is GlideAjax?
GlideAjax is a ServiceNow API that allows Client Scripts to communicate with server-side Script Includes and retrieve information without directly querying the database from the client.
Scenario: When a user selects a Caller on an Incident, the Assignment Group should automatically populate based on the Caller’s Location.
Prerequisites:
- Caller records must have their Location field populated.
- Corresponding assignment groups must exist in ServiceNow.
Implementation:
We will use two components:
1. Script Include
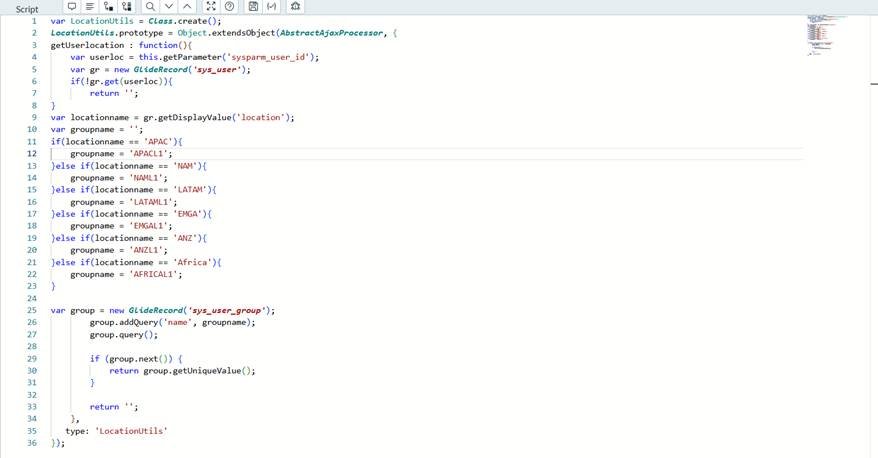
Create a Client Callable Script Include named LocationUtils.
The Script Include:
- Retrieves the selected Caller using their sys_id.
- Identifies the Caller’s Location.
- Determines the corresponding Assignment Group based on predefined conditions.
- Retrieves and returns the Assignment Group’s sys_id.
Use the following script:
2. onChange Client Script
Create an onChange Client Script on the Incident table.
- Name: Auto Assign Group Based on Caller Location
- Field name: Caller (caller_id)
- Type: onChange
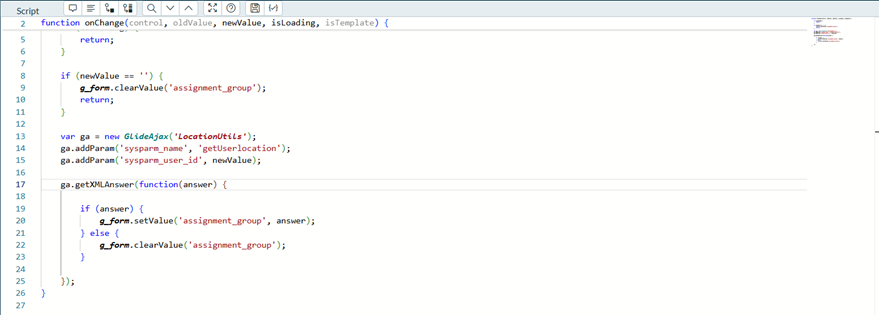
Use the following script:
How Does It Work?
- When the Caller is selected, the onChange Client Script executes.
- GlideAjax calls the LocationUtils Script Include and passes the selected Caller’s sys_id.
- The Script Include retrieves the Caller’s Location and identifies the corresponding Assignment Group.
- The Script Include returns the Assignment Group’s sys_id.
- The Client Script uses g_form.setValue() to populate the Assignment Group field.
Expected Result:
When a Caller is selected, the Assignment Group is automatically populated based on their Location.
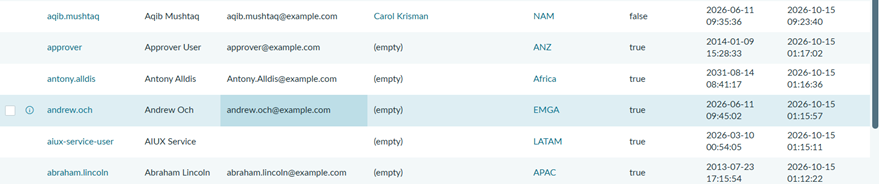
Output:

7. Comparison of Auto Assignment Approaches
To ensure you choose the right tool for the job, here is a comparison of the three approaches covered in this article.
| Feature | Approach 1: Assignment Rules | Approach 2: onChange + getReference | Approach 3: onChange + GlideAjax |
| Where it runs | Server-side (Background) | Client-side (Form) | Client-side (Form) |
| Requires Code? | No (Configuration) | Yes (Client Script) | Yes (Client Script + Script Include) |
| Data Fetch | Native table query | Pulls entire Reference record | Customized (Pulls only what’s needed) |
| UI Feedback | Instant (upon save/submit) | Instant (on field change) | Instant (on field change) |
| Performance | Excellent | Poor (if not optimized) | Excellent |
| Complexity | Low | Low | Medium |