
A Now Assist skill is a single, reusable AI task on ServiceNow: it takes some data, follows your written instructions and returns a result such as a summary or a draft message. This article explains what skills are, when to use them, what ServiceNow already provides and how to build your own. The worked example is a skill that writes short incident status updates for business stakeholders.
What is a Now Assist skill?
Think of a skill as a specialist who does one job well. Every skill has four parts:
| Part | What it is | In our example |
| Inputs | The data the skill works from | An incident record |
| Prompt | The written instructions for the AI model | Role, rules, format, word limit |
| Model | The AI model that runs the prompt | The provider set for your instance |
| Output | The text the skill returns | A status update starting with “Subject:” |
A skill can also use tools, such as a flow action or script, to fetch extra data. Our example does not need one.
Skill or AI agent? A skill does one task. An AI agent plans and carries out several steps, and it can use a skill as one of its tools.
A note on names: recent releases also call this product AI Skill Kit and the admin console AI Admin Hub. This article uses the Now Assist names, and menu labels may differ in your release.
Why use skills?
- Consistent: the same instructions run every time, so every result follows the same format and rules.
- Based on your data: the skill works from your records, and a test view shows exactly what the AI model received.
- Controlled: you set the instructions, the model and who is allowed to run the skill.
- Reusable: one skill can sit behind a form button, inside a flow or in a chat, and can serve as a tool for an AI agent.
When to use a skill
Use a skill for a single writing task that repeats often and always has the same shape: the same kind of data in, the same kind of text out.
- Good fit: summarizing a record, drafting a message, writing resolution notes, judging the sentiment of a comment.
- Better as an AI agent: work that takes several steps or needs decisions, such as investigating an incident and choosing which tools to use. The agent can still call your skills along the way.
Existing skills: use, customize or build?
Start with the skills ServiceNow already provides, and build your own only when none fits. ServiceNow itself advises most admins to stay with the ready-made skills, and notes that it cannot monitor or manage custom ones.
Examples of ready-made skills (the list depends on your product and release):
| Skill | What it does |
| Incident summarization | Summarizes an incident |
| Resolution notes generation | Drafts resolution notes from incident details |
| Knowledge article generation | Drafts a knowledge article from a resolved incident |
| Chat summarization | Summarizes chat conversations |
| Case summarization | Summarizes customer or employee cases |
These skills are maintained by ServiceNow, cover the everyday tasks, and some, such as incident summarization, are switched on by default for new users.
How to decide:
| Situation | What to do |
| A ready-made skill already does the job | Turn it on and use it |
| It is close, but the instructions or model are wrong | Adjust it in Now Assist Admin. If that is not enough, clone it in Skill Kit and edit the prompt or model |
| You need different inputs, outputs or placement, or nothing fits | Build a custom skill |
Two things to remember. A clone can change only the prompt, the model and the usage conditions, not the inputs, outputs, tools or placement. And Now Assist Admin is where skills are turned on, while Skill Kit is where custom skills are built.
Our example needs a different audience, format and set of inputs than incident summarization, so we build a custom skill.
How to build the incident status update skill
The steps below adapt ServiceNow’s Survey Sentiment Analysis hands-on lab to an incident status-update skill. Screenshot placeholders identify where to add captures from your own instance.
How it fits together
- An analyst opens an incident and clicks a button on the form.
- The skill reads the incident’s fields and places them in the prompt.
- The AI model writes the status update.
- The update appears as a message at the top of the form, ready for the analyst to review.
Before you start
- A Now Assist license, an instance on Xanadu or later, and the Skill Kit plugin installed. Skill Kit is not available on personal developer instances.
- The sn_skill_builder.admin role for whoever builds the skill. Log out and back in after it is assigned.
- A Now Assist admin to activate the skill at the end.
- A test incident that has a short description and a description.
Part 1: Create the skill
- Go to All > Now Assist Skill Kit > Home.
- Select Create skill.
- Define the skill:
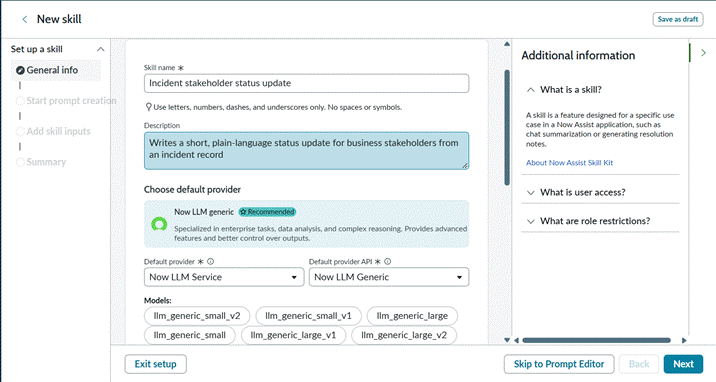
- Name: Incident Stakeholder Status Update (if the form rejects spaces, use underscores)
- Description: Writes a short, plain-language status update for business stakeholders from an incident record.
- Default provider: Now LLM Service
- Provider API: Now LLM Generic
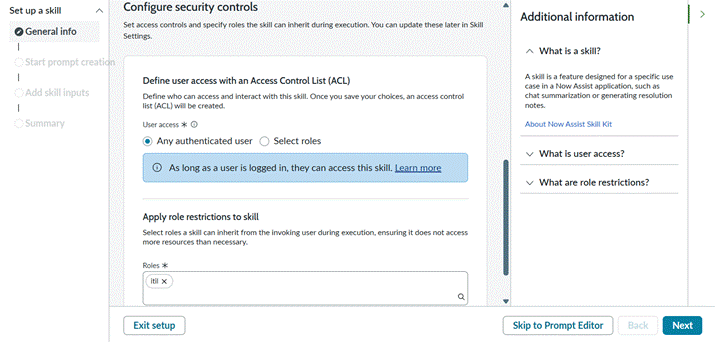
- Configure security controls:
- User access: choose Select roles, then pick the role your service desk uses, for example itil.
- Role restrictions: add a role that can read incident records, for example itil. The skill runs with these roles, so it can never read more than they allow.
- Select Next.
- Under How would you like to create a prompt for this skill?, select Write from scratch. The lab uses an AI-generated prompt, but we already have our own text. Then select Next.
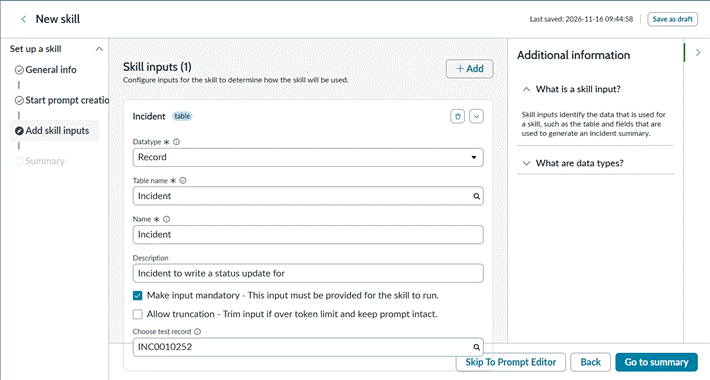
- Select +Add and define the skill input:
- Datatype: Record
- Table name: Incident [incident]
- Name: Incident
- Description: Incident to write a status update for
- Make input mandatory: checked
- Allow truncation: checked, so very long text is trimmed instead of breaking the prompt
- Choose test record: any incident that has a description
- Select Go to summary.
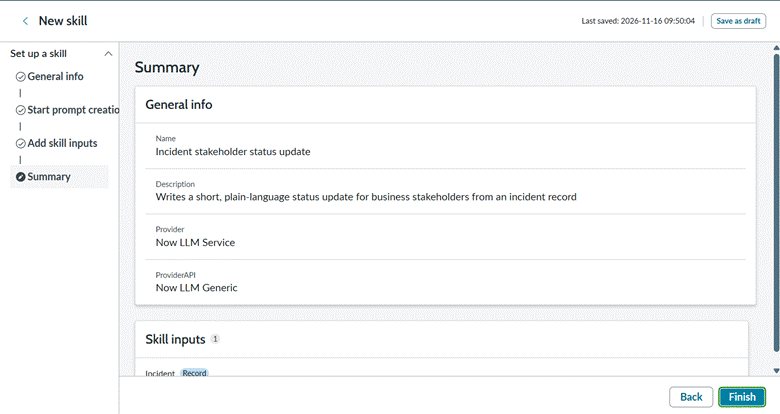
- Review the summary and select Finish.
Part 2: Write the prompt in the Prompt Editor
The Prompt Editor is where you write the prompt, insert inputs, set the model options and test.
- Select Skip tour to dismiss the Welcome to Prompt Editor screen.
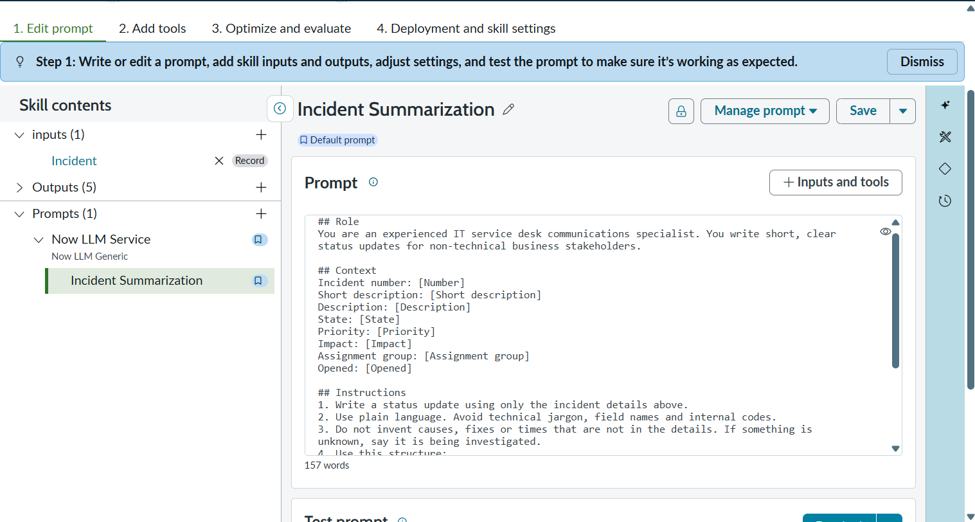
- Paste this into the Prompt field. Each bracketed item is a placeholder you will replace in the next step.
## Role
You are an experienced IT service desk communications specialist. You write short, clear status updates for non-technical business stakeholders.
## Context
Incident number: [Number]
Short description: [Short description]
Description: [Description]
State: [State]
Priority: [Priority]
Impact: [Impact]
Assignment group: [Assignment group]
Opened: [Opened]
## Instructions
1. Write a status update using only the incident details above.
2. Use plain language. Avoid technical jargon, field names and internal codes.
3. Do not invent causes, fixes or times that are not in the details. If something is unknown, say it is being investigated.
4. Use this structure:
– Subject line
– What is happening (1-2 sentences)
– Business impact (1 sentence)
– What we are doing (1-2 sentences)
– Next update (say another update will follow as soon as there is progress)
5. Keep the whole update under 120 words.
6. Tone: calm, professional and reassuring, without overpromising.
## Output
Return only the update text, starting with “Subject:”.
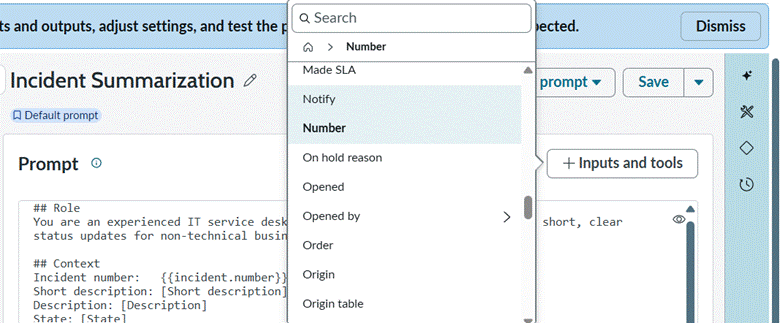
- Replace each placeholder with a real field. Select the placeholder text, delete it, keep the cursor in place and select + Inputs and tools. Under Skill Inputs, expand Incident and pick the field from this list:
| Placeholder | Field to pick |
| [Number] | Number |
| [Short description] | Short description |
| [Description] | Description |
| [State] | State |
| [Priority] | Priority |
| [Impact] | Impact |
| [Assignment group] | Assignment group, then dot-walk to its Name |
| [Opened] | Opened |
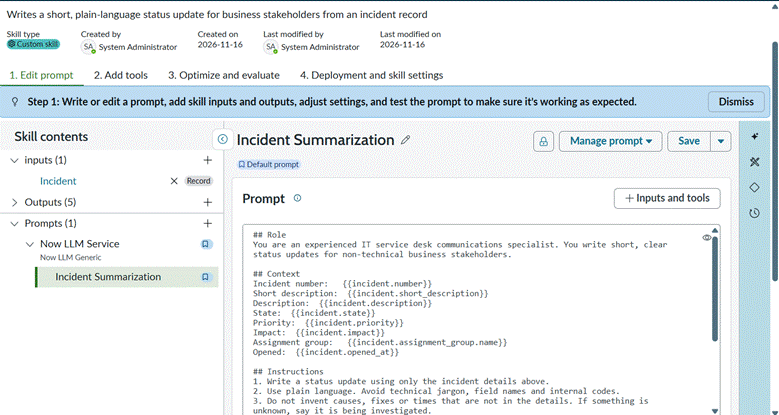
Each pick appears in the prompt as a placeholder in the form {{incident.number}}. If a reference field such as Assignment group shows an ID in the test, dot-walk to Name as in the table.
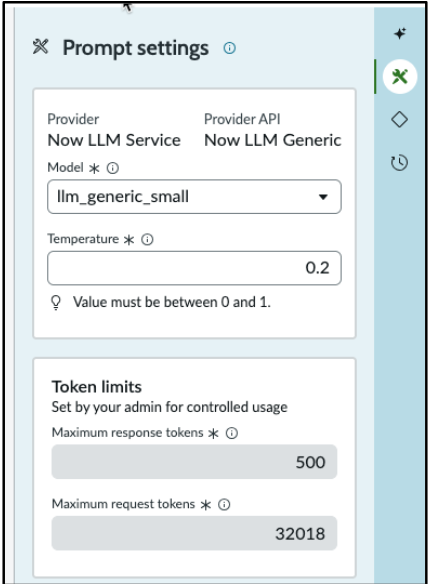
- Open Prompt settings (under Prompt Assistance, on the right) and review three things:
- Model: the lab uses the default, llm_generic_small. Other models may be available to you.
- Temperature: the lab default is 0.2, on a scale of 0 to 1. A higher value gives more varied wording. Keep it low so every update reads consistently.
- Token limits: the lab shows 500 for the response and 32018 for the request, set by your admin. Our update is under 120 words, so it fits well within the response limit.
- Skip the Add tools tab. Tools fetch extra data, and the lab uses a subflow because survey answers live in related records. Our skill needs none because every field comes straight from the incident.
Part 3: Finalize, deploy and activate the skill
Step 1: Test and Finalize the Prompt
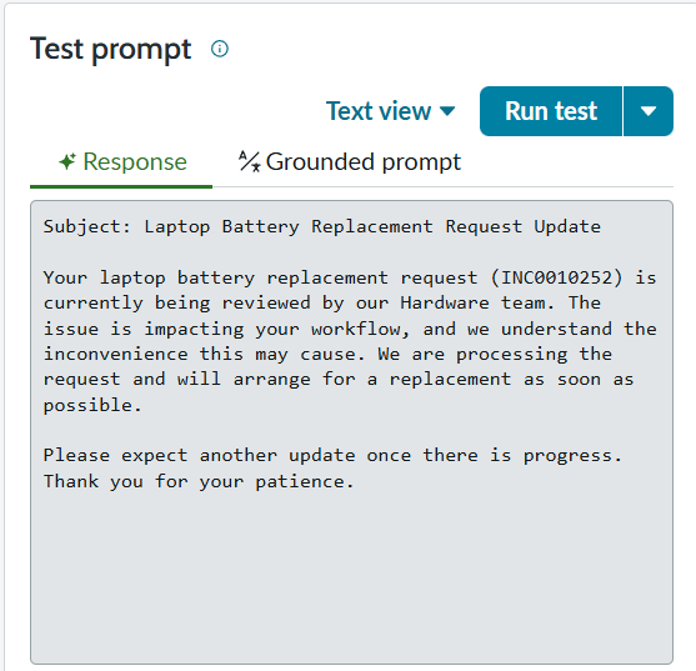
1. Select Test to run the prompt using the selected incident record.
2. Review the generated response for accuracy, correct field values, and the required format.
3. Check the Grounded Prompt to confirm that the incident fields are mapped correctly.
4. Make any necessary corrections and test again.
5. Rename the prompt to Generate Incident Stakeholder Status Update.
6. Select Finalize Prompt and confirm.
Step 2: Configure Skill Deployment
1. Open Deployment and Skill Settings.
2. Go to Deployment Settings.
3. Select the appropriate workflow option, if available.
4. Enable UI Action as the deployment method.
5. Select the Incident [incident] table.
6. Choose Create UI Action and link it to the skill.

Step 3: Review the UI Action
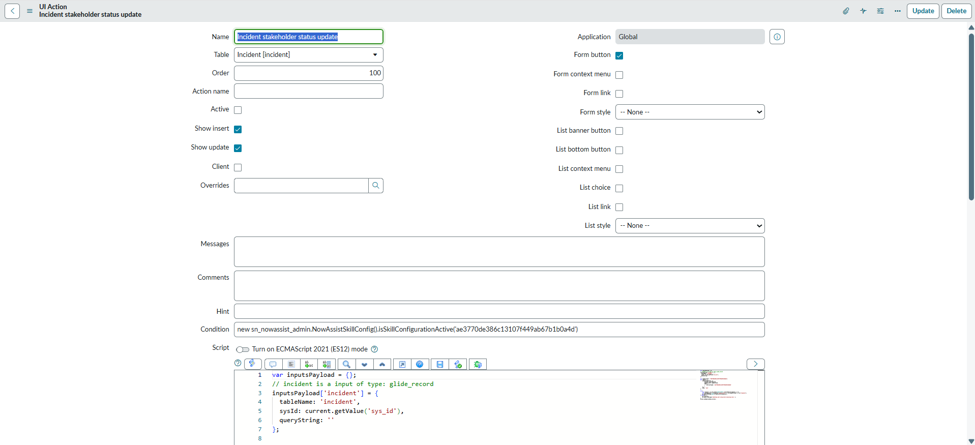
1. Open the generated UI Action.
2. Verify its name and confirm that the table is Incident.
3. Review the generated script to ensure it invokes the configured skill.
4. Save the UI Action.
Step 4: Publish the Skill
1. Return to the skill configuration.
2. Open Deployment Settings.
3. Select Publish Skill.
4. Review the version and finalized prompt.
5. Confirm publication.
Step 5: Activate the Skill
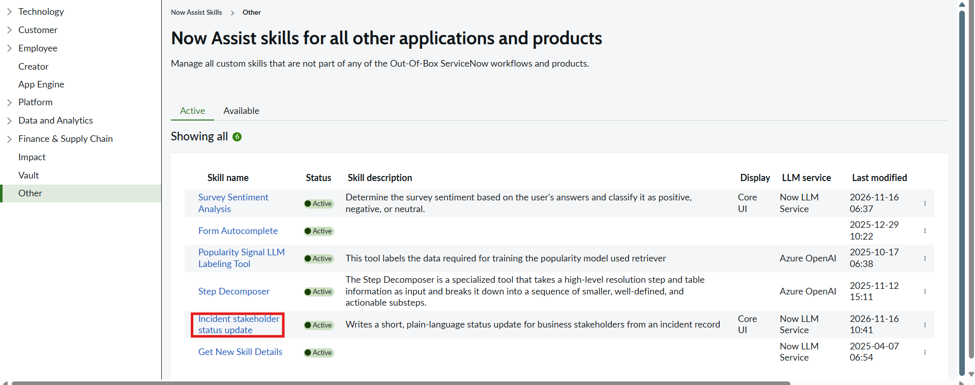
1. Navigate to Now Assist Admin and open Skills.
2. Locate the published skill under the appropriate workflow.
3. Select Activate Skill.
4. Configure access and display settings as required.
5. Review the configuration and confirm activation.
6. Verify that the skill appears under the Active tab.
Step 6: Test the Deployed Skill
1. Navigate to All > Incidents.
2. Open an incident containing meaningful details.
3. Locate and run the deployed UI Action.
4. Review the generated stakeholder update for accuracy and completeness.

Best practices and troubleshooting
- Test with messy data: include empty and very long inputs, not just the easy case.
- Be specific in the prompt: state the format, the length and what to do when information is missing.
- One job per skill: a focused skill is easier to test and to reuse as an agent tool.
- Pass only the fields the task needs: it keeps internal detail out and the results tighter.
- Build inside an update set: custom skills cannot be deleted in the product, and an update set tracks everything the skill created.
- Watch assist usage: testing and live runs both use assists. Ask your ServiceNow account representative for per-skill figures.
If something goes wrong:
| Problem | Likely cause |
| Permission error opening Skill Kit | The sn_skill_builder.admin role is missing, or you have not logged out and back in since it was assigned |
| Skill Kit is missing from the navigator | The instance is older than Xanadu, the license has lapsed, the plugin is not installed or it is a personal developer instance |
| Users cannot see the skill | It is not published, not activated in Now Assist Admin, or no deployment location was chosen |
| A test returns no response | A connection problem with the model provider |
Key takeaways
- A Now Assist skill is one focused AI task made of inputs, a prompt, a model and an output.
- Start with ready-made skills. Customize or build your own only when the inputs, outputs, placement or audience truly differ.
- Use a skill for a single writing task, and an AI agent for work with several steps.
- A strong prompt sets a role, limits the data, states the rules and fixes the output format.
- Test with awkward cases, then publish, deploy and have an admin activate the skill. A person should always review the output.